
FAST Exam
Author Credentials
Written by: Doug Franzen, MD. University of Washington, Seattle, Washington
Editor: Caitlin Schrepel, MD. (2022 Revision). University of Washington. Rahul Patwari, MD. Rush University, Chicago, Illinois. (original version).
With special thanks for images and reviewing to Michael Vrablik, DO. University of Washington, Seattle, Washington.
*All images and videos are owned by authors, Dr. Franzen and Dr. Vrablik. University of Washington.
Case Study
You are working in the ED when the charge nurse approaches your senior resident. “We’re getting three patients from an MVC. ETA 10 minutes. One is hypotensive, and there was a fatality on scene.” Your senior nods and looks at you - “how are your FAST exam skills?” The clerkship’s ultrasound workshop isn’t until next week and you admit that while you’ve looked at images and think you can spot an abnormal exam, you haven’t had the chance to do a FAST exam yet. “Why don’t you watch and we’ll let you try next time,” says your senior. “It’s going to be a bit hectic and I don’t think I’ll have time to walk you through it.” The hypotensive patient turns out to have a positive FAST and is rushed to the OR. Once the traumas are stabilized and things quiet down, you resolve to learn how to do a FAST exam.
Objectives
By the end of this module, the student will be able to:
- List the four different FAST windows and the important structures that should be visualized with each.
- Describe probe positioning for each of the windows.
- Discuss where to look for evidence of free fluid in each of the views.
Note: In this module, you can hover over ultrasound images to make labels appear. Hover off to make the labels disappear. If viewing on a touch screen, you’ll have to touch a different picture to make the labels disappear. The labels on the picture don't always behave on a mobile device and you may want to use the following browsers: Firefox and Google Chrome.
Introduction
Background
The original papers describing the FAST (Focused Assessment with Sonography in Trauma) examination focused on identifying free intraperitoneal or pericardial fluid in blunt trauma patients. Since then, the use of ultrasound (US) in trauma has expanded to identifying a variety of traumatic injuries: hemoperitoneum, pneumothorax, hemothorax, hemopericardium with or without tamponade, traumatic hypovolemia, and even rib fractures!
Indications
Current indications for performing a FAST examination include blunt and penetrating cardiac and chest trauma, trauma in pregnancy, pediatric trauma, undifferentiated hypotension, and even evaluation of medical (non-trauma) patients for ascites. Numerous algorithms have been published with flowcharts of how and when the FAST exam should be incorporated into the assessment of the trauma patient. Building on these, many institutions have their own internal policies about the use of the FAST exam – I recommend learning what your institution’s protocols are (and why). Whether the FAST exam is used extensively or minimally, few will argue the utility of FAST in the hypotensive trauma patient who is too unstable for CT but without a clear indication for laparotomy.
Probe Selection
You will need to use a low-frequency (3.5MHz) transducer. Many authors recommend using a curvilinear array as this provides excellent intra-abdominal views. In practice, some views may be difficult to obtain with this probe due to
the patient’s anatomy or body habitus.
As a result, it is sometimes necessary to switch to a small footprint phased-array (“cardiac”) probe to obtain some views. Some emergency physicians (EP’s) use a phased-array probe to obtain all images. Not only does it provide excellent cardiac views, it can also provide great intraabdominal views and thoracic/pleural views and saves the time required to switch transducers and re-optimize the settings. Most machines will allow you to change the probe settings from “cardiac” to “abdominal.” Ideally, you’ll have access to a machine with a variety of probes and an easy way to switch from one probe to another.
To conceptualize the difference between the frequencies of the probes, think of music coming from a speaker. Low-frequency music (bass) often penetrates far and wide. This is why you can hear the bass in the car next to you but not the treble. Additionally, it's hard to pinpoint exactly where it is coming from. This is why we can hide the subwoofer behind a couch. Similarly low-frequency ultrasound probes have good depth but at the cost of resolution (loss of detail). Higher frequency probes have good detail but do not penetrate as deeply. They are more useful for looking for superficial structures that we want to see clearly -- like blood vessels.
Views
10 structures or spaces are typically imaged via 4 windows in a FAST examination; other views may be included and other structures evaluated. The windows and what is evaluated include:
- Cardiac (most often subxiphoid, but other views may be obtained):
- pericardium and
- heart chambers, especially the right ventricle
- Right Upper Quadrant (RUQ):
- Morrison’s Pouch (hepatorenal recess),
- liver tip (right paracolic gutter) and
- lower right thorax
- Left Upper Quadrant (LUQ):
- subphrenic space,
- splenorenal recess,
- spleen tip (left paracolic gutter) and
- lower left thorax.
- Pelvic:
- rectovesical pouch (male patients) or,
- in female patients, rectouterine / pouch of Douglas.
Additional views may include:
- Additional cardiac views (apical, parasternal long and short axis)
- Inferior vena cava / cavoatrial junction – to help assess volume status
- Pleural line views, which may be performed in one or more areas of each side of the chest – to evaluate for pneumothorax (as part of the extended FAST, or eFAST)
General Technique
The patient should be positioned supine (not usually a problem during a trauma). Most examiners prefer to stand to the patient’s right, which allows you to use your right hand to hold the probe and your left hand to work the controls and save images/video clips. Standing to the patient’s right may not always be possible, so it’s good to learn to be flexible. If your patient is awake and cooperative, it can be helpful to have them place their arms behind their head, opening up the lateral trunk. Placing the patient in Trendelenburg position can improve the sensitivity of your exam.
Some people start with the RUQ view, others with the subxiphoid view; some start with a specific area depending on the mechanism of injury – for example, if there is a concern for a hemopericardium with tamponade due to penetrating trauma, a cardiac view is often obtained first. Some then proceed clockwise, others counterclockwise, and still others go across from RUQ to LUQ because the depth and gain settings are similar to those for the RUQ. Ultimately, the order does not really matter so long as all views are obtained. Like much else in medicine, have a system and stick to it every time you do a FAST exam to ensure you obtain all views.
Cardiac
The FAST exam most commonly uses the subxiphoid (alternatively “subcostal”) view to assess the pericardial space. To obtain this view, place the transducer just inferior and to the patient’s right of the xiphoid process. Yes, you read that correctly – to the right of the xiphoid process. While it sounds counterintuitive, this placement uses the liver as an acoustic window allowing better visualization of the heart. The indicator marker on the probe should point towards the patient’s right. Aim the beam toward the patient’s left shoulder. Your scanning plane should be closer to a coronal plane than a transverse plane (i.e. point the probe more towards the patient’s head than their spine). Holding the probe with an “overhand” grip will help facilitate this. Your depth will need to be set deeper than for abdominal windows, often 20-25cm depending on the size of your patient. If you’re having trouble, set the depth very deep and (usually) the motion of the heart will be easy to see. You can then adjust the depth as needed once you find the heart. Having the patient take and hold a deep breath may also help with visualization.
Conventions and the marker dot
Due to historical conventions, typical “cardiac” settings for a machine put the marker dot on the right side of the screen – the mirror image of typical abdominal settings.
Marker Dot Right

(Figure 10B/10B.1)
Marker Dot Left
Other sonographers use the “abdominal” setting and follow the emergency medicine convention of having the indicator marker on the left side of the US screen when imaging the heart.

(Figure 10A)
Still others maintaining the “abdominal” settings but then rotate the probe 180o to give the appearance of typical cardiac settings. While any of these will provide the information you need, at most institutions one is preferred over the other. Talk to the ultrasound director at your institution to learn which orientation is preferred. It’s good to learn both, as you may ultimately work at an institution that prefers the other way. Additionally it is prudent to learn how to adjust the image settings so you can easily toggle from marker dot left to marker dot right.
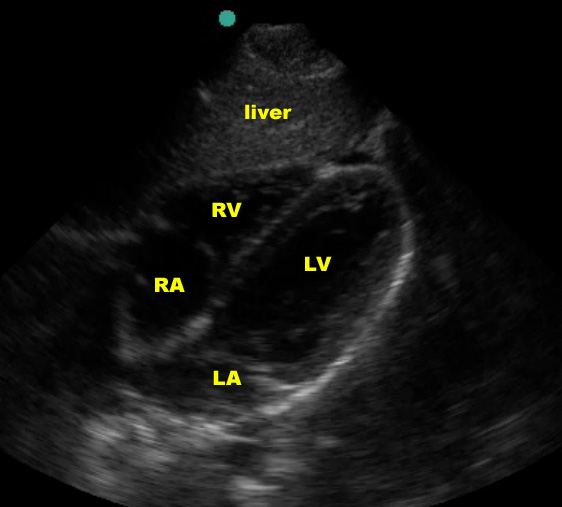
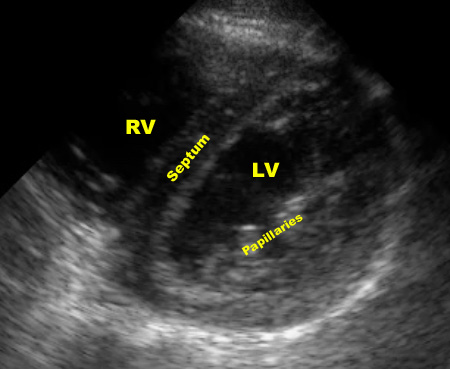
Subxiphoid view
In the normal subxiphoid view (also known as “subcostal”), a small amount of liver should be seen at the top of the screen, superficial to the right ventricle, with the thicker-walled left ventricle deeper. The right ventricle is somewhat V-shaped whereas the left ventricle is more U-shaped. Using typical emergency medicine conventions (marker dot upper left of screen), the atria will be to the left and the apex to the right on the US screen. The entire heart should be surrounded by an echogenic layer of pericardium.
(Figure 10A/11.1)
Other Cardiac Windows
If you are having difficulty visualizing the heart with the subxiphoid view, you can try parasternal or apical windows. Here are some examples – but you should go to the “Pericardial Effusion” section for more details on how to obtain these other views.
Parasternal Long-Axis view

(Figure 13)
This view mainly focuses on the left ventricle and the associated valves.
Parasternal Short Axis View
(Figure 14/14.1)
In this view, the probe has been rotated 90° from the long axis view, providing a cross section through the left and right ventricles. Typically, the examiner “fans” the probe to get cross sections from the mitral valve to the apex.
Apical view
In the apical four-chamber view, the apex of the heart is at the top of the screen with the atria in the farfield.

-crop.jpg?sfvrsn=8f413c65_1)
(Figure 15/15.1)
Hemopericardium
In the trauma patient, you will be looking for hemopericardium. If present, fluid will separate the visceral from the parietal pericardium, causing two echogenic layers with an anechoic space between. It is very difficult to tell blood from other fluids with ultrasound, so any fluid in a trauma patient should be considered to be blood until proven otherwise.
(Figure 12/12.1)
This is almost always easier to appreciate on a video clip.
A full discussion of the findings indicative of tamponade are beyond the scope of this article; in the trauma setting it is wise to assume that any pericardial fluid is abnormal, enlarging, and will soon cause tamponade.
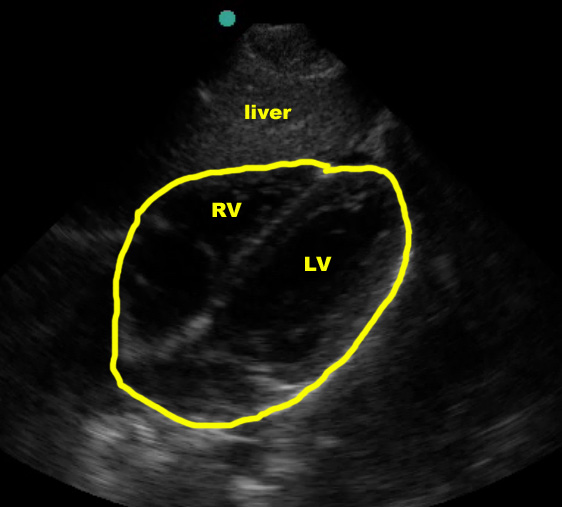
Cardiac US can also be used to assess for major volume loss – you may see a minimally distended right ventricle and/or hyperdynamic left ventricle.
False Negatives
Small fluid collections can be difficult to see. Be sure the depth is set appropriately to allow full evaluation of the pericardium. In the supine patient, fluid is most likely to be found posteriorly (although it may be found elsewhere). Clotted blood in the pericardium may be echogenic and hard to see or mistaken for the apical fat pad (see below).
Additionally, echocardiography is a very advanced field. Subtle abnormalities not related to the FAST can be missed (i.e. wall motion or valvular abnormalities). It is important to keep in mind your level of training and the question you are attempting to answer. “No pericardial fluid” is a safer interpretation for the novice sonographer than “normal study.”
False Positives
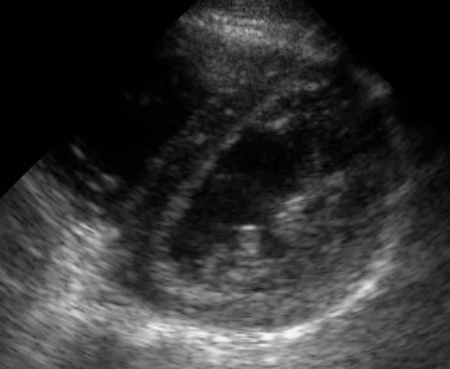
One common false positive is the apical fat pad.

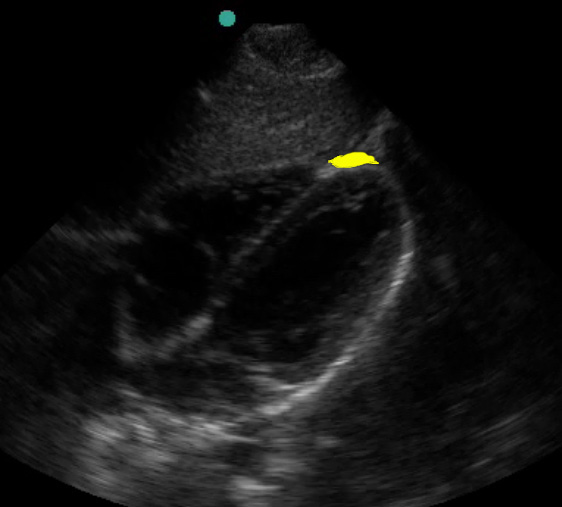
(Figure 10A/16.1)
This hypoechoic structure lies anteriorly and can be mistaken for fluid. Close examination may reveal septations in the fat; additionally, the more posterior pericardial space should have fluid if there is hemopericardium.
Right Upper Quadrant (RUQ)
- Start with the transducer in the mid-axillary line at approximately the level of the 10th rib (or slightly inferior to the xiphoid if it’s difficult to see the ribs) with the indicator marker on the US probe pointing towards the patient’s head. This may reveal the liver, the right kidney, or (ideally) both.
- If only the kidney is seen, slide the probe cephalad along the mid-axillary line one rib space at a time until the liver is seen. If only the liver is visualized, slide the probe caudad one rib space at a time until you find the kidney. If you do not encounter the kidney, you may be too far anterior – slide your probe posterior and repeat the caudad/cephalad exploration. (If you can’t find either the liver or the kidney, make sure your machine is turned on, the depth is correct, the gain is up, your eyes are open…)
- Once the liver/kidney interface is located, adjust the probe so the hepatorenal space is centered on the screen, then fan the probe in all directions to fully evaluate the area. It may be necessary to move one rib space inferiorly to evaluate the liver tip.
- If rib shadows are a problem, you can first try rotating the probe around its axis (akin to throttling a motorcycle), pointing the US probe indicator marker more posteriorly (approximately 10-11 o’clock, if the mid-axillary line is noon.) If this does not work, you can have the patient inhale or exhale to help obtain the image. This is often necessary to work around rib shadows. No matter what technique you use to obtain your images, make sure to scan the area thoroughly.
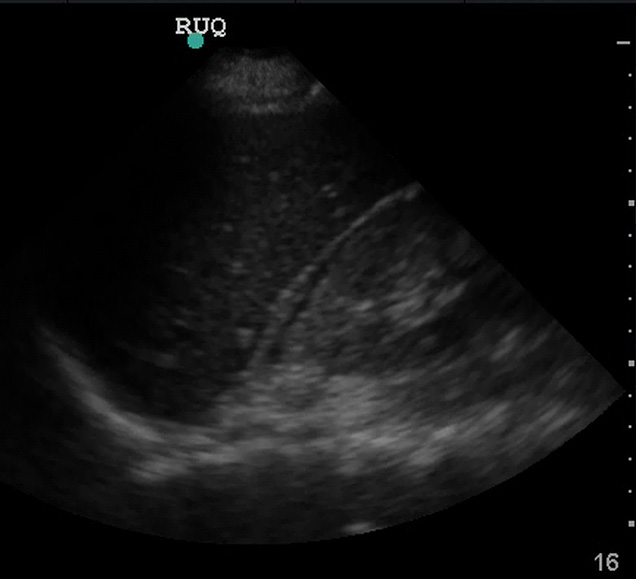
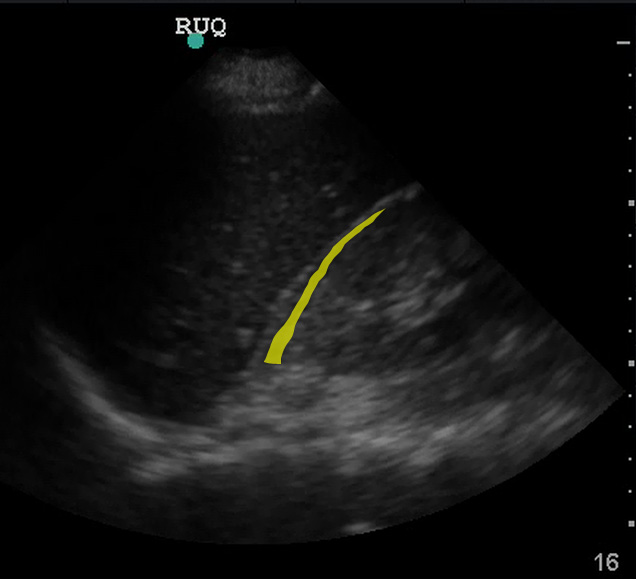
In the normal scan, the liver and kidney are tightly juxtaposed, with a hyperechoic line separating them.
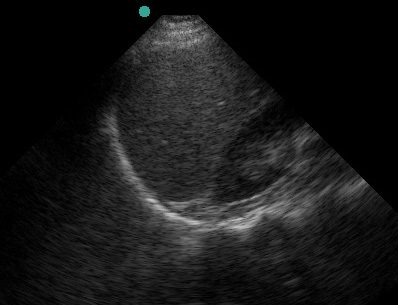
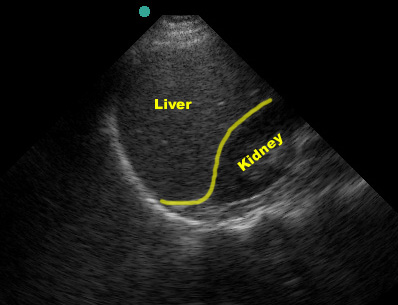
(Figure 20/20.1)
This line represents the potential hepatorenal space (AKA Morrison’s pouch). Textbooks and teaching images tend to show large fluid collections which demonstrate the space well but are a little misleading.
(Figure 21/21.1)
Look carefully! Small fluid collections can be subtle but are still a positive FAST exam.
(Figure 22/22.1)
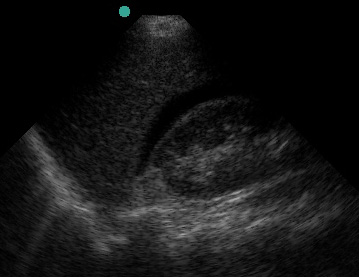
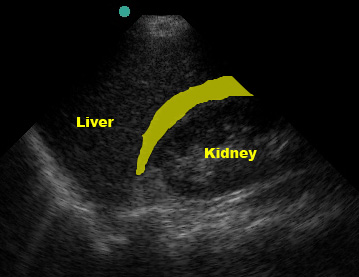
Although Morrison’s pouch is the most dependent (“deepest”) space in the supine patient, blood from elsewhere in the abdomen may not yet have tracked into Morrison’s pouch. If blood is going to seep into this area, it will flow through the paracolic gutter past the tip of the liver. Thorough evaluation of the RUQ includes visualizing the inferior tip of the liver as fluid may collect in this area instead of (or prior to) Morrison’s pouch.
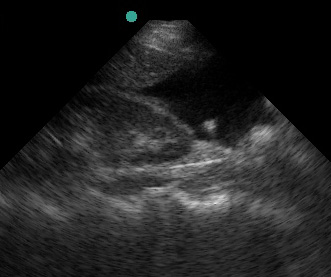
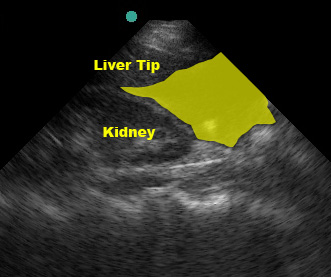
(Figure 23/23.1)
False Negatives
It is not uncommon for novice sonographer to find the liver/kidney interface and declare a FAST negative based on this single view, only to be proven wrong by a more experienced examiner or a CT scan. Be sure to thoroughly evaluate the area, fanning through the entire interface.
Additionally, although it is possible to see intraparenchymal and subcapsular hemorrhage (and you should keep your eye out for these!), they are not reliably detected by ultrasound. Thus, a negative FAST exam does not rule out these injuries.
False Positives
One common pitfall is mistaking the gallbladder for free fluid, which can happen if you scan too anteriorly.

(Figure 25/25.1)
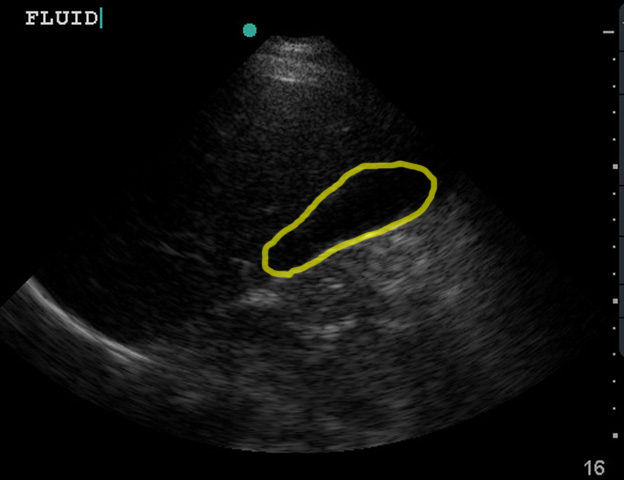
The IVC can also be mistaken for free fluid if you are too posterior.
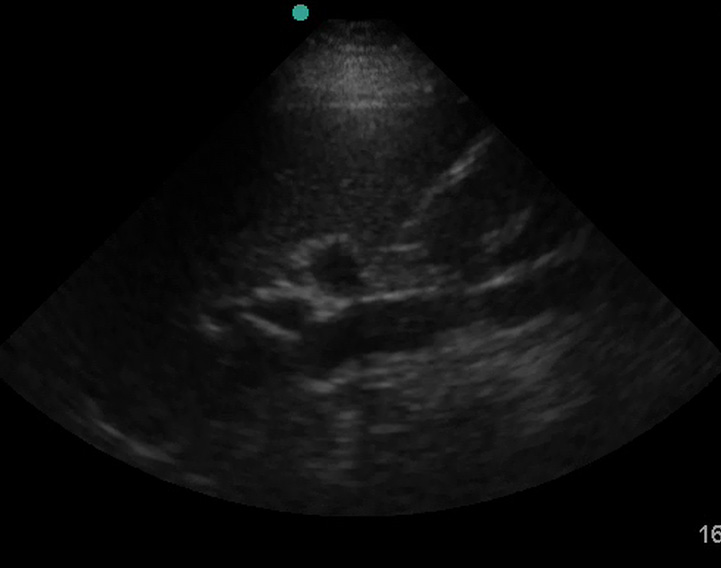
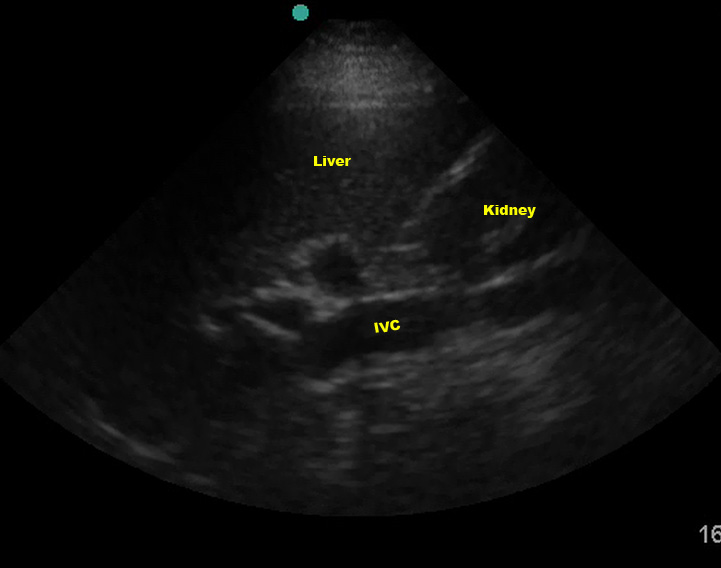
(Figure 26/26.1)
Renal cysts can also look like free fluid. If you think you see free fluid, evaluate it thoroughly to make sure it is indeed in Morrison’s pouch. Intraperitoneal fat can also look like fluid. (Discussing how to discern between fat and fluid is beyond the scope of this article. For now, assume any hypoechoic or anechoic signal is fluid.)
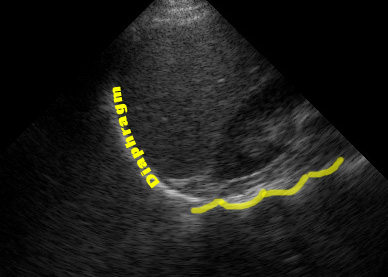
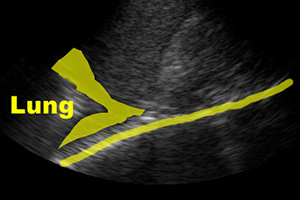
Right (and left) Thorax
Once the abdominal spaces have been thoroughly evaluated, slide the probe cephalad to evaluate the thorax. The diaphragm is easily visible as a bright echogenic stripe just cephalad to the liver (or spleen), and it should move with the patient’s respirations. Normally, the thorax is “empty” on ultrasound – everything cephalad to the diaphragm is the “noise” caused by the multiple air/fluid interfaces of the lung parenchyma. You may even have a mirror artifact (most commonly seen on the right) with a faint mirror image of the liver cephalad to the diaphragm. Any of the following findings suggests hemothorax:
- the “spine sign”
- anechoic fluid above the diaphragm or
- soggy lung (tissue/liver signal).
While an anechoic stripe above the diaphragm alone makes the diagnosis, I have found that beginners may not always have their machine’s settings optimized and as a result it may appear that the region above the diaphragm is anechoic, leading to a false-positive interpretation.
The spine sign
The “spine sign” is fairly straightforward to evaluate. If you increase the depth on your RUQ (or LUQ) view, you should notice vertebrae and intervertebral discs in the farfield caudad to the diaphragm.
(Figure 27B/27B.1)
You should NOT see these cephalad to the diaphragm because the air in the lungs attenuates the returning signal from the spine and chest wall. Thus, visualizing the spine or chest wall cephalad to the diaphragm suggests that there is fluid in the thorax transmitting sound.

(Figure 27A/27A.1)
Soggy Lung Sign
Soggy lung is pathognomonic, but can be easy to overlook or write off as a mirror artifact as it’s a finding we’re not used to seeing. Things with solid organ density don’t belong up in the thorax!
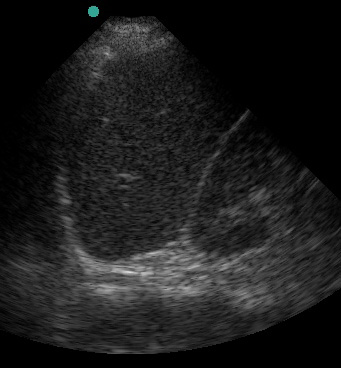
Left Upper Quadrant (LUQ)
The spleen sits a little more posterior and superior than the liver. For the LUQ view, the transducer should be placed in the posterior axillary line at approximately the level of the 8th rib with the indicator marker on the probe pointing towards the patient’s head. This may reveal the spleen, the left kidney, or (ideally) both. In many trauma patients, it shows a stomach full of fast-food and “2 beers” – which can make this view difficult.
The spleen is also smaller than the liver – so it’s OK if you don’t find it right away. Be patient and systematic. As with the RUQ, slide the probe along the chest wall cephalad/caudad until you have a good view of the spleen. If you can only find the kidney, use that as a base and explore cephalad to that. If you don’t find the spleen, move more posterior and try again. It’s not unusual for your hand to be so far posterior it’s on the bed while imaging the spleen. Once the spleen/kidney interface is located, just like in the RUQ, be sure to fan the probe in all directions to fully evaluate the area. Rotating the probe so the indicator marker points a little posterior, utilizing the diaphragm to push things around, and using respiratory variation to get ribs out of the way are almost always necessary. (These techniques are described in the RUQ section.)
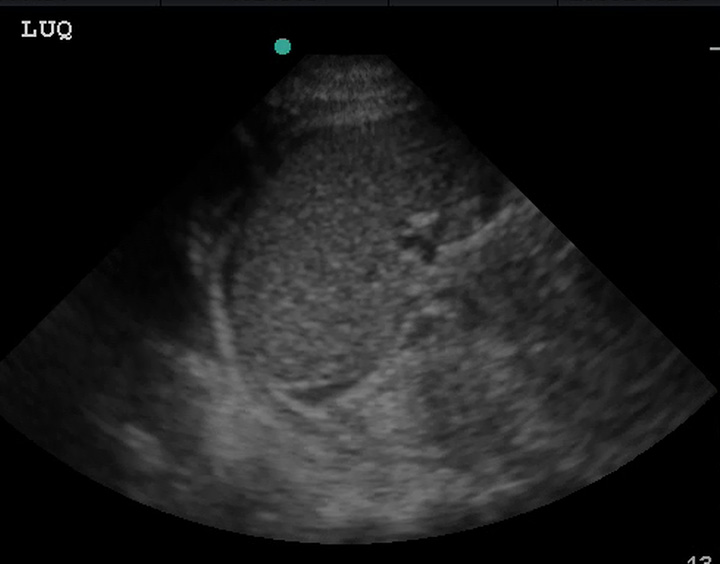
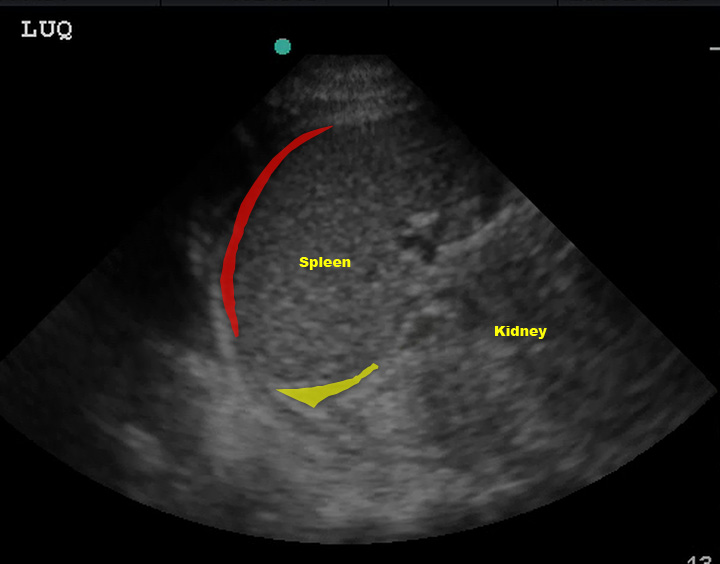
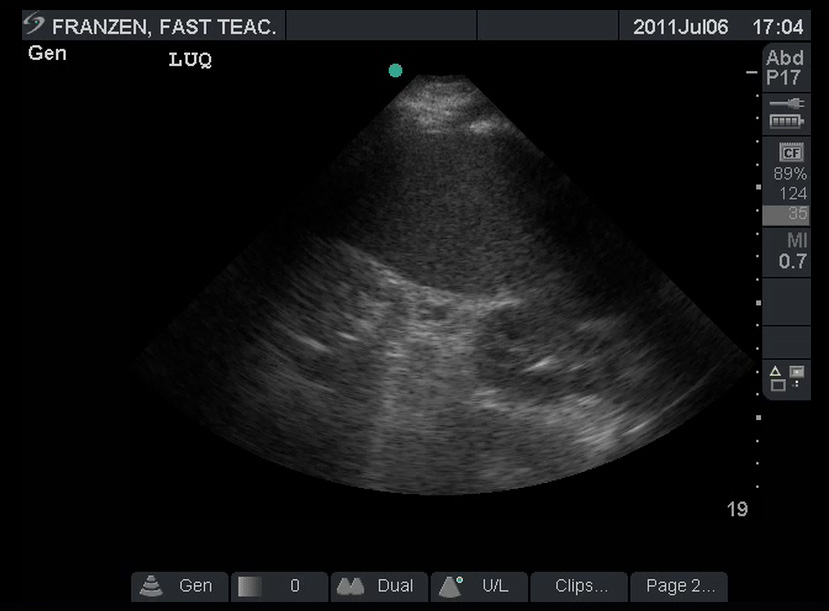
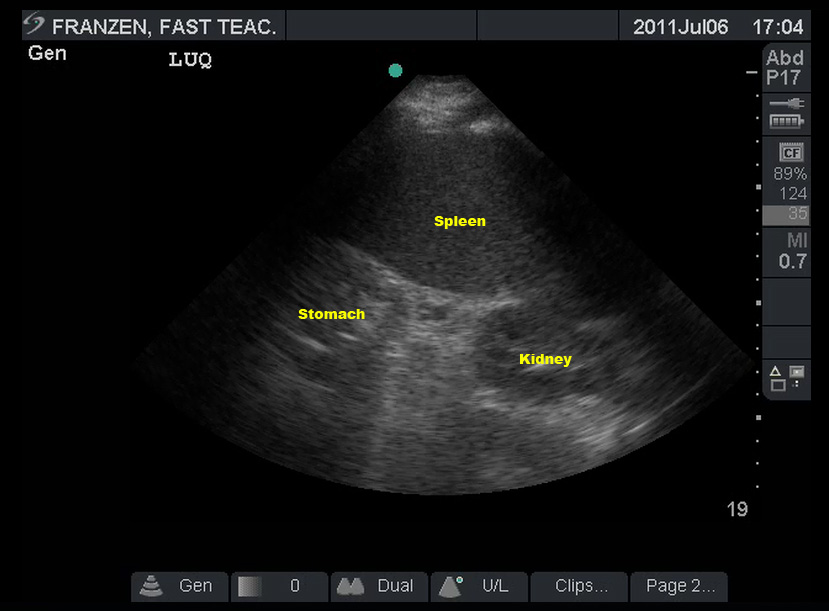
In the normal scan, the spleen and kidney are tightly juxtaposed, with a hyperechoic line separating them. The diaphragm is the echogenic line just cephalad to the spleen.
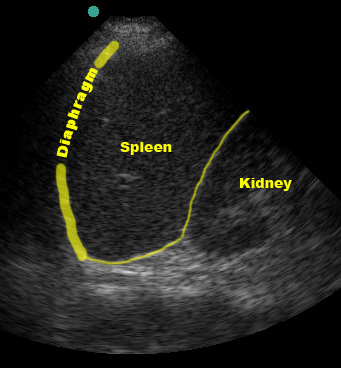
(Figure 30/30.1)
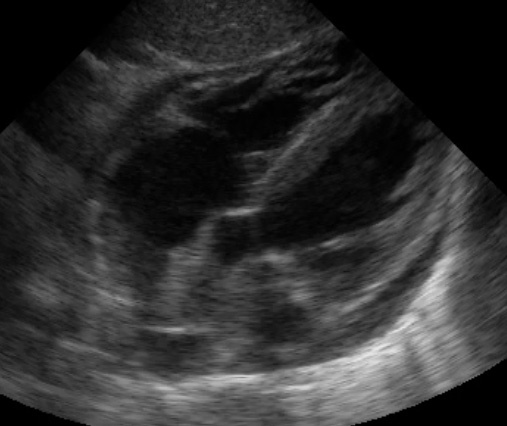
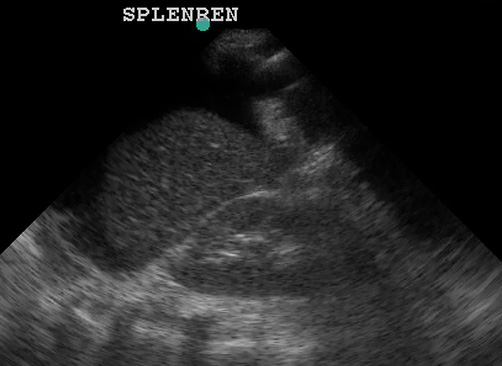
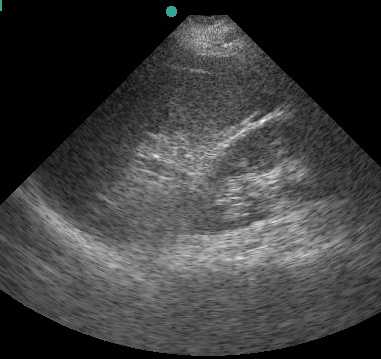
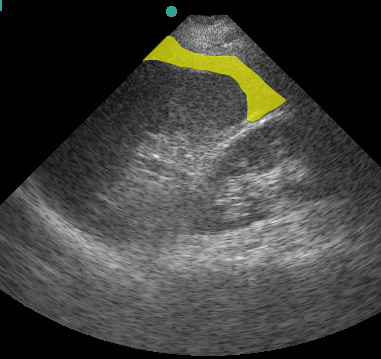
Just like the RUQ, fluid can appear in the splenorenal recess. HOWEVER, the trickiest part of evaluating the LUQ is that fluid is most likely to be found in the subphrenic space, between the spleen and diaphragm.
(Figure 31/31.1)
In the above picture, the red represents subphrenic fluid and the yellow denotes fluid in the splenorenal space.
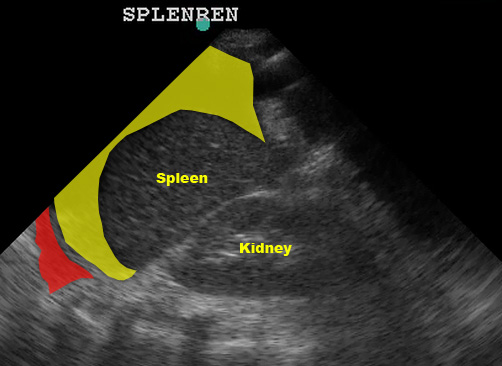
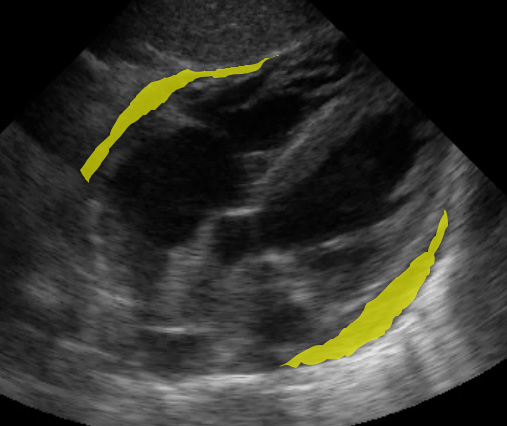
(Figure 32/32.1)
In this picture above, note the large amount of fluid in the subphrenic space (yellow) despite the lack of fluid in the splenorenal space. Also note the fluid in the left thorax (red).
You may need to move the transducer up a rib space from your view of the splenorenal recess to fully evaluate the subphrenic space; the stomach and the lung can make getting a good view difficult. While you’re up there, evaluate the left thorax as you did on the right. Once you’ve evaluated this area, you will need to evaluate the left paracolic gutter (or “tip of the spleen”). Just like in the RUQ, you will usually need to move down a rib space to visualize the spleen tip/left paracolic gutter.
 (Figure 33/33.1)
As noted in the RUQ discussion, as you scan look for intraparenchymal or subcapsular hemorrhage but remember that these injuries are not reliably detected by ultrasound and a negative FAST exam does not rule them out.
False Negatives
Much like the RUQ, many beginners exclaim “Negative!” triumphantly as soon as they find the splenorenal recess. Be sure to thoroughly evaluate the area, looking for the slightest hint of fluid. Sweep anterior/posterior as well as caudad/cephalad. As mentioned above, fluid is more likely to be found in the subphrenic space, which is harder to image than the splenorenal recess.
 (Figure 34/34.1)
Pelvis
Urine in the bladder makes evaluating the pelvis much easier. Although we’ve gotten away from the days of the old ATLS mantra “a finger and a tube in every orifice,” it’s still pretty common for trauma patients to get a foley catheter. If you can, try to get pelvic images before the catheter is placed. To image the pelvis, place the probe on the abdominal midline just superior to the pubic symphysis with the US probe indicator marker to the patient’s right. If the bladder is not immediately visible (it usually is in most “2 beer” trauma patients), be sure you’re right against the symphysis and then aim the beam into the pelvis by angling the transducer to point more toward the patient’s feet. The bladder is usually easily identifiable due to the anechoic urine it contains.
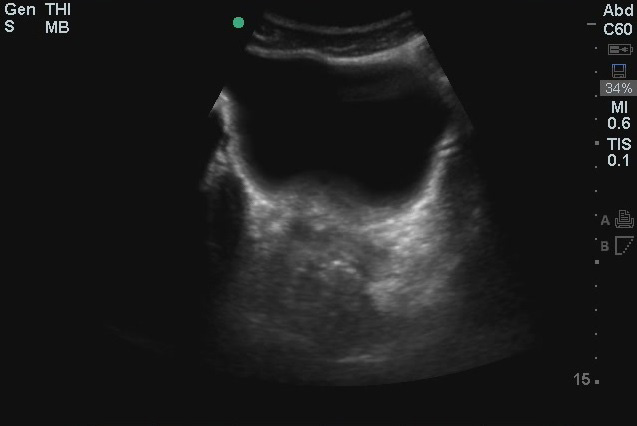
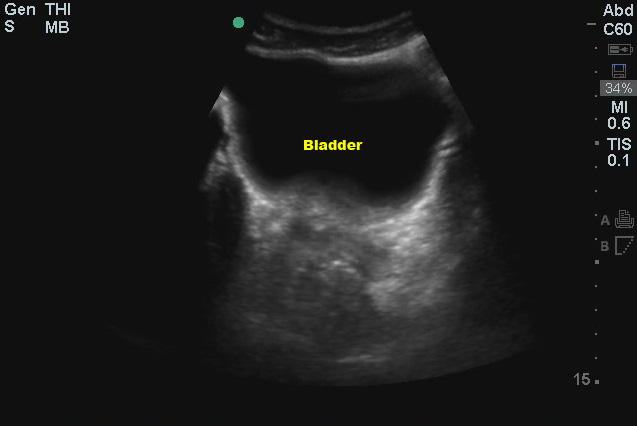
(Figure 40/40.1)
Once you’ve found it, sweep caudad/cephalad to view the entire bladder. Now rotate the probe 90o clockwise so the US probe marker is now pointing towards the head and repeat the scan in a sagittal plane, sweeping left to right.
In males, free fluid will collect just deep to the bladder, in the rectovesical pouch (the potential space between the bladder and prostate).
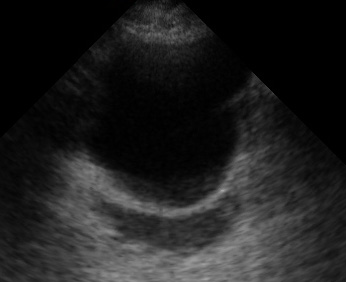
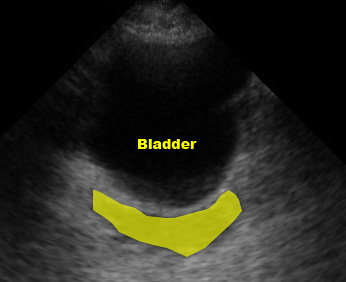
(Figure 41/41.1)
Transverse view (marker dot to patient’s right)

(Figure 42/42.1)
Sagittal view (marker dot to patient’s head)
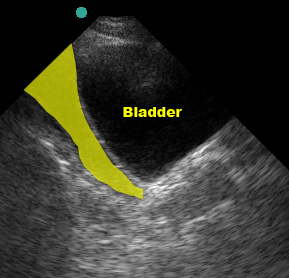
In females, fluid will initially collect in the pouch of Douglas, posterior to the uterus, NOT between the bladder and uterus. If there is a large volume of fluid, the pouch of Douglas can “overflow” and you may see fluid between the bladder and uterus.

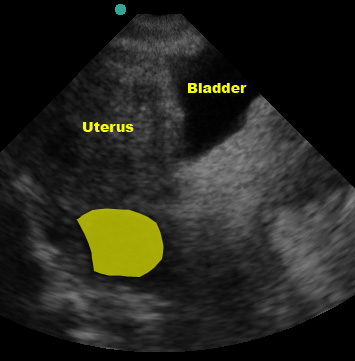
(Figure 43/43.1)

(Figure 44)
False Negatives
Urine in the bladder will cause “acoustic enhancement” deep to the bladder which may mask a thin stripe of fluid. You may need to turn down the gain to account for this. As mentioned, in females, fluid deep to the uterus is sometimes missed due to the sonographer focusing on the interface between bladder and uterus (where one would look in a male patient).
False Positives
In males, the seminal vesicles are occasionally mistaken for free fluid. Fibroids, ovarian cysts, and even physiologic pelvic fluid may be mistaken for hemoperitoneum in the female patient. As a beginner it is far better to “overcall” and risk a false positive than it is to misinterpret a true positive as a benign finding.
That completes a basic FAST examination. Like all other procedures in medicine (including many physical exam techniques), experience is key. Practice doing FAST exams whenever you can – as you perform more and more, you will get faster at it and better able to recognize abnormalities. A great time to practice FAST exams is immediately after a trauma patient returns from the CT scanner. The patient is usually stable (it’s rare to send an unstable patient to CT), the initial steps of evaluation and resuscitation are complete, and you have a few minutes until the CT is read. In addition, because the patient already had a CT, you can “check your answers” by comparing your FAST exam interpretation to the CT results.
Pearls and Pitfalls
- As noted above, be sure to evaluate each area thoroughly before making your interpretation.
- Be sure to save your images and video clips for review!
- Positive findings may initially be very subtle. Fortunately, the FAST can be repeated! If you have an area you’re not sure about, wait a few minutes and repeat your exam.
- A positive FAST does not always mean a patient needs to be rushed to the operating room. In many trauma algorithms, a hemodynamically stable patient may still get a CT after a positive FAST.
- Like everything else in medicine, practice is the key.
Case Study Resolution
You have a little down time on the shift and review this chapter. One of the interns lets you practice a FAST on them and gives you a few pointers. You’re feeling pretty confident that you can do a good FAST exam. Just before your shift ends, another MVC is called out with a stable patient arriving in a few minutes. You ask the senior if you can do the FAST. “Sure,” she says. When the patient arrives, you perform a flawless exam. A CT confirms your negative findings. Great job!
References
- All images and videos are owned by authors, Dr. Franzen and Dr. Vrablik. University of Washington.
- Bloom BA, Gibbons RC. Focused Assessment with Sonography for Trauma. StatPearls [Intranet]. Treasure Island (FL): StatPearls Publishing; 2022 Jan. Available from: https://www.ncbi.nlm.nih.gov/books/NBK470479/
- Ma O, Mateer JR, Reardon RF, Byars DV, Knapp BJ, Laudenbach AP. eds. Ma and Mateer's Emergency Ultrasound, 4e. McGraw Hill; 2021. Accessed December 15, 2022. Available from: https://accessemergencymedicine.mhmedical.com/content.aspx?bookid=2966§ionid=249628880