
Circulation: Electricity
Author Credentials
Update Author: Shruti Chandra, MD, MEHP, Department of Emergency Medicine, Thomas Jefferson University Hospital.
Original Author: Kathleen Fane, MD, Department of Emergency Medicine, Temple University Hospital
Update Editor: Navdeep Sekhon, MD. Baylor College of Medicine (2023 update).
Original Editor: Julianna Jung, MD, Department of Emergency Medicine, Johns Hopkins University School of Medicine (Original version)
Update: 2023
Case Study
You are working overnight in the Emergency Department, when the nurse calls you to the bedside of a patient who just came in. The 75-year-old patient is awake, but lethargic. Her vital signs are a temperature of 98.6°F, pulse is 160 beats per minute, and a blood pressure of 70/30 mm Hg. Her oxygen saturation is 92% on a non-rebreather mask. The nurse places the patient on the monitor, which shows the following
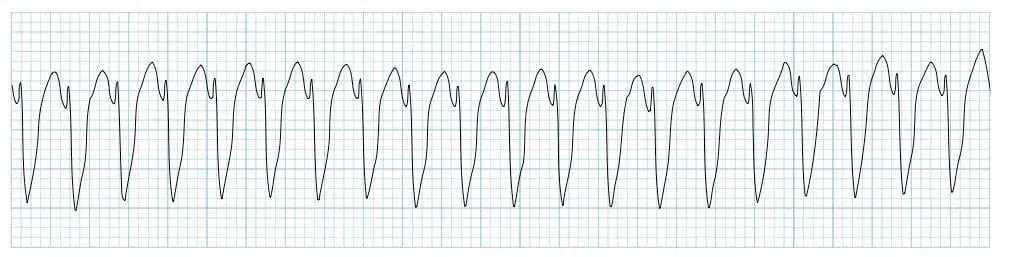
Figure 1. Patient’s rhythm strip. Courtesy of Life in the Fast Lane and used via the https://creativecommons.org/licenses/by-nc-sa/4.0/. The original image is located at: Ventricular Tachycardia – Monomorphic VT • LITFL • ECG Library
The nurse asks, “What do you want to do, doc?” while you plan your next steps to resuscitate the patient.
Objectives
By the end of this module, the student will be able to:
Describe the indications for using electricity for cardiac arrhythmias
List the indications and steps for pacing, cardioversion and defibrillation
Discuss an overview of Permanent pacemakers and Internal Cardiac Defibrillators
Introduction
The Emergency Department (ED) physician is faced daily with patients with heart rhythm disorders, some of which require electrical therapies to treat their conditions. This chapter covers electrical therapy that may be required in the emergency department, including:
External/internal cardiac pacing
Electrical cardioversion
Defibrillation.
The chapter also touches upon the basics of permanent internal pacemakers and defibrillators.
Initial Actions and Primary Survey
In the emergency department, electrical therapy is typically used for patients with arrhythmias who are unstable. Electrical therapy is generally preferred over medications in the unstable patient.
The first step is to assess the ABCs and determine the presence of a pulse. Pulseless rhythms are treated according to ACLS guidelines. This may include defibrillation which is covered below.
If the patient has a pulse, the next step is to determine if the patient is stable or unstable. An unstable rhythm, whether tachycardic or bradycardic, exists when the cardiac output is significantly reduced to cause signs and symptoms of insufficient perfusion.
The signs/symptoms of insufficient perfusion include:
Altered mental status
Pulmonary edema
Chest pain
Hypotension
Dyspnea
Ischemic changes on the EKG
For all these patients:
Maintain airway
Provide O2 in case Pulse Ox is low
Establish IV or IO access
Obtain a 12 lead ECG
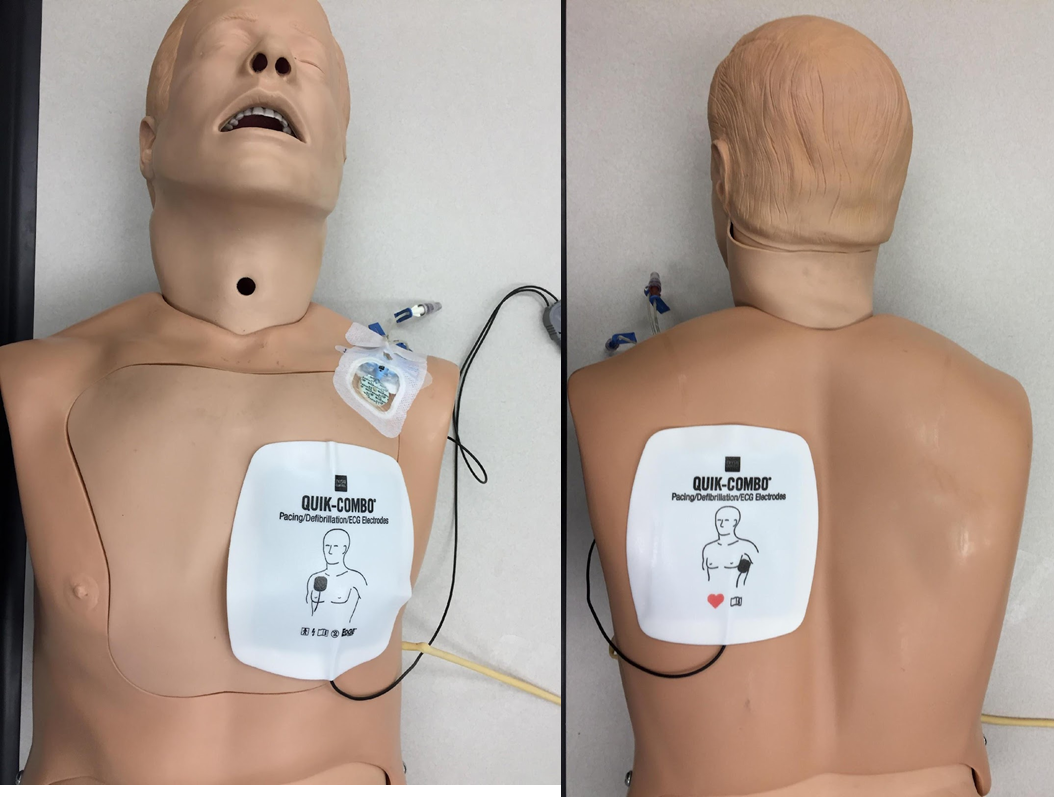
Place hands free defibrillator pads. Place pads on the chest in one of two positions: anterolateral or anteroposterior. The positions are displayed below in the following images.
Anterolateral

Figure 2. Anterolateral positioning of defibrillator pads. Image courtesy of James P Sarwark, MD and Andrew Pirotte, MD.
Anteroposterior
Cardiac Pacing
In patients with hemodynamically unstable bradycardia, or where medications like Atropine have not been successful, the next step is cardiac pacing.
The most likely cause of unstable bradycardia requiring pacing is an Atrioventricular (AV) block, typically either third degree (complete) AV block or a high grade (Mobitz II) second degree AV block. Complete AV block is most commonly seen after long-term progression of conduction system disease (ie prior bundle branch block). Less frequently, severe sinus bradycardia related to sinus node dysfunction can also require pacing, but these patients are typically less symptomatic than those with AV blocks. Further discussion of the ekg findings of AV blocks are in the CDEM chapter “Conduction Abnormalities” (Conduction abnormalities (saem.org)).
Below are some additional causes of bradycardia. These causes should be addressed and treated before or in conjunction with pacing.
Electrolyte disturbances such as hyperkalemia can lead to AV blocks.
Acute myocardial infarction (MI) can cause either AV block or severe sinus bradycardia.
Toxicities and drug overdoses can cause suppression of either the sinus node or AV node. Check the patient medication list for digoxin, beta-blockers, calcium channel blockers or any anti-arrhythmic medications.
AV blocks can also be seen acutely with Lyme disease or after heart surgery.
Transcutaneous Pacing
Most patients with hemodynamically unstable bradycardia are transcutaneously paced first due to the speed in which it can be initiated. This is performed via the external pads placed on the chest.
The duration and amplitude of the stimulating impulse are greater compared to internal pacemakers, thus contributing to patient discomfort from the periodic electrical shocks. Electrical resistance across the chest wall may contribute to difficulty capturing the electrical system of the heart. Both of these features can limit the utility of this therapy. Since mechanical capture can fail frequently, it is wise to prepare for the next step, transvenous pacing, immediately.
Steps for Transcutaneous Pacing
1. Place pads on the chest
2. If patient is awake and alert, administer pain medication and/or sedation medications. If unstable or unresponsive, sedation may be withheld.
3. Turn machine on and select the Pacer button. (image: standard buttons on the Defibrillator/Pace

Figure 4. Turning on the machine and selecting pacer function.
4. Select the rate - 70 to 80 ppm
 Figure 5. Selecting the rate at which the transcutaneous pacer fires.
5. Select a current and adjust gain upward until electrical capture is noted on the monitor. Electrical capture is a pacer spike followed by a QRS complex.
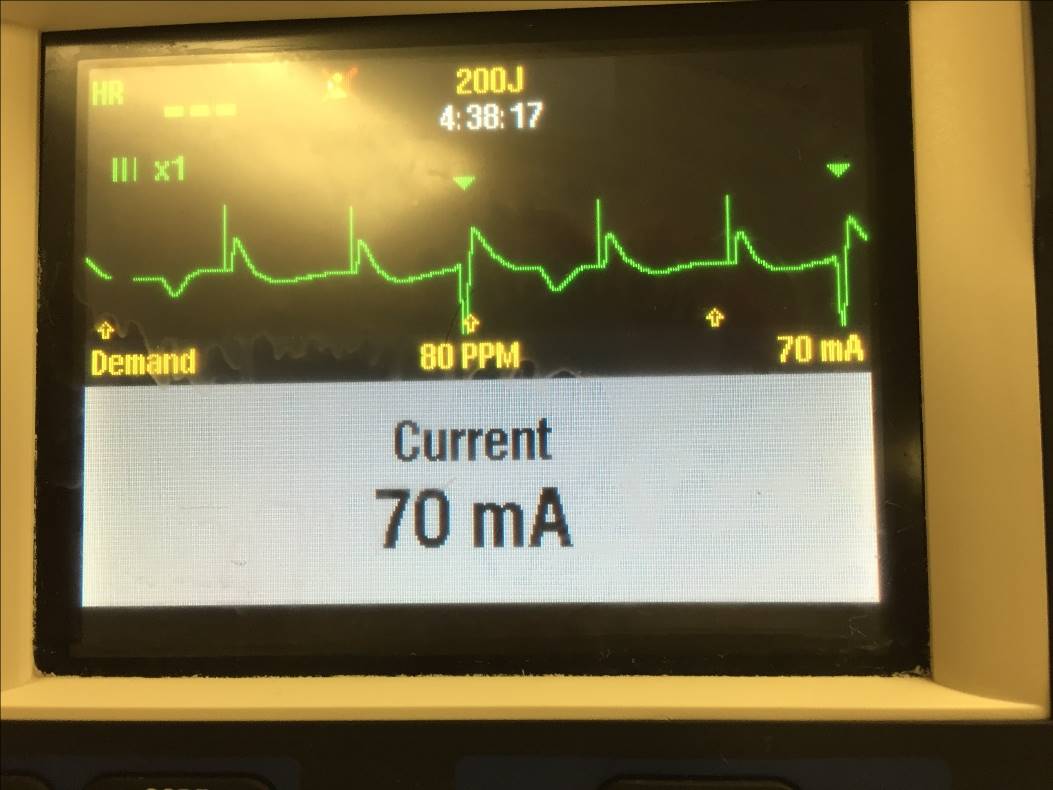 Figure 6. Selecting the current that the device provides to the pads.
6. Look for evidence of electrical capture on the Monitor as evidenced by the 3 images below.
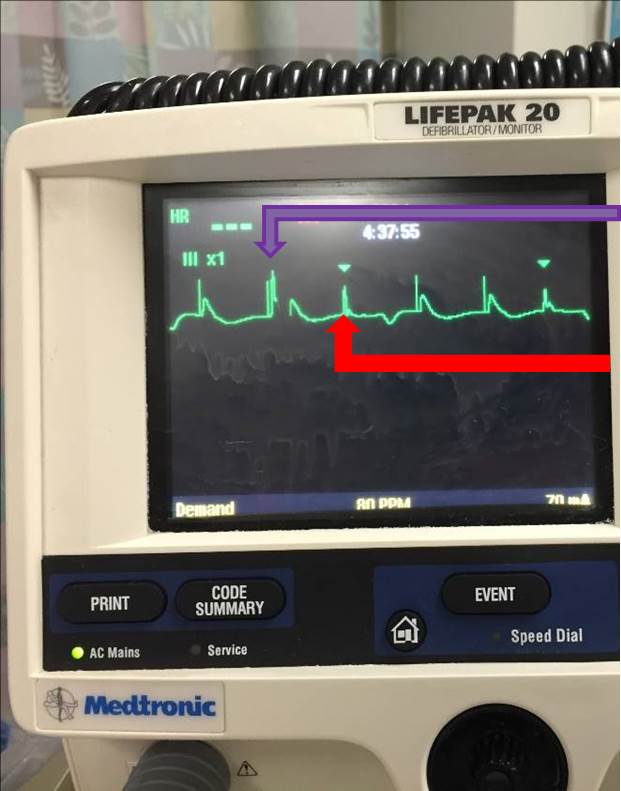 Figure 7. Image demonstrating the native QRS complex (green arrow), pacer spikes and captured beats (purple arrow).
a. Image above demonstrates sensing (green) arrowheads that denote a native QRS complex; in between there are pacer spikes which are a straight vertical line followed by a wide QRS complex. Purple=Captured Beat
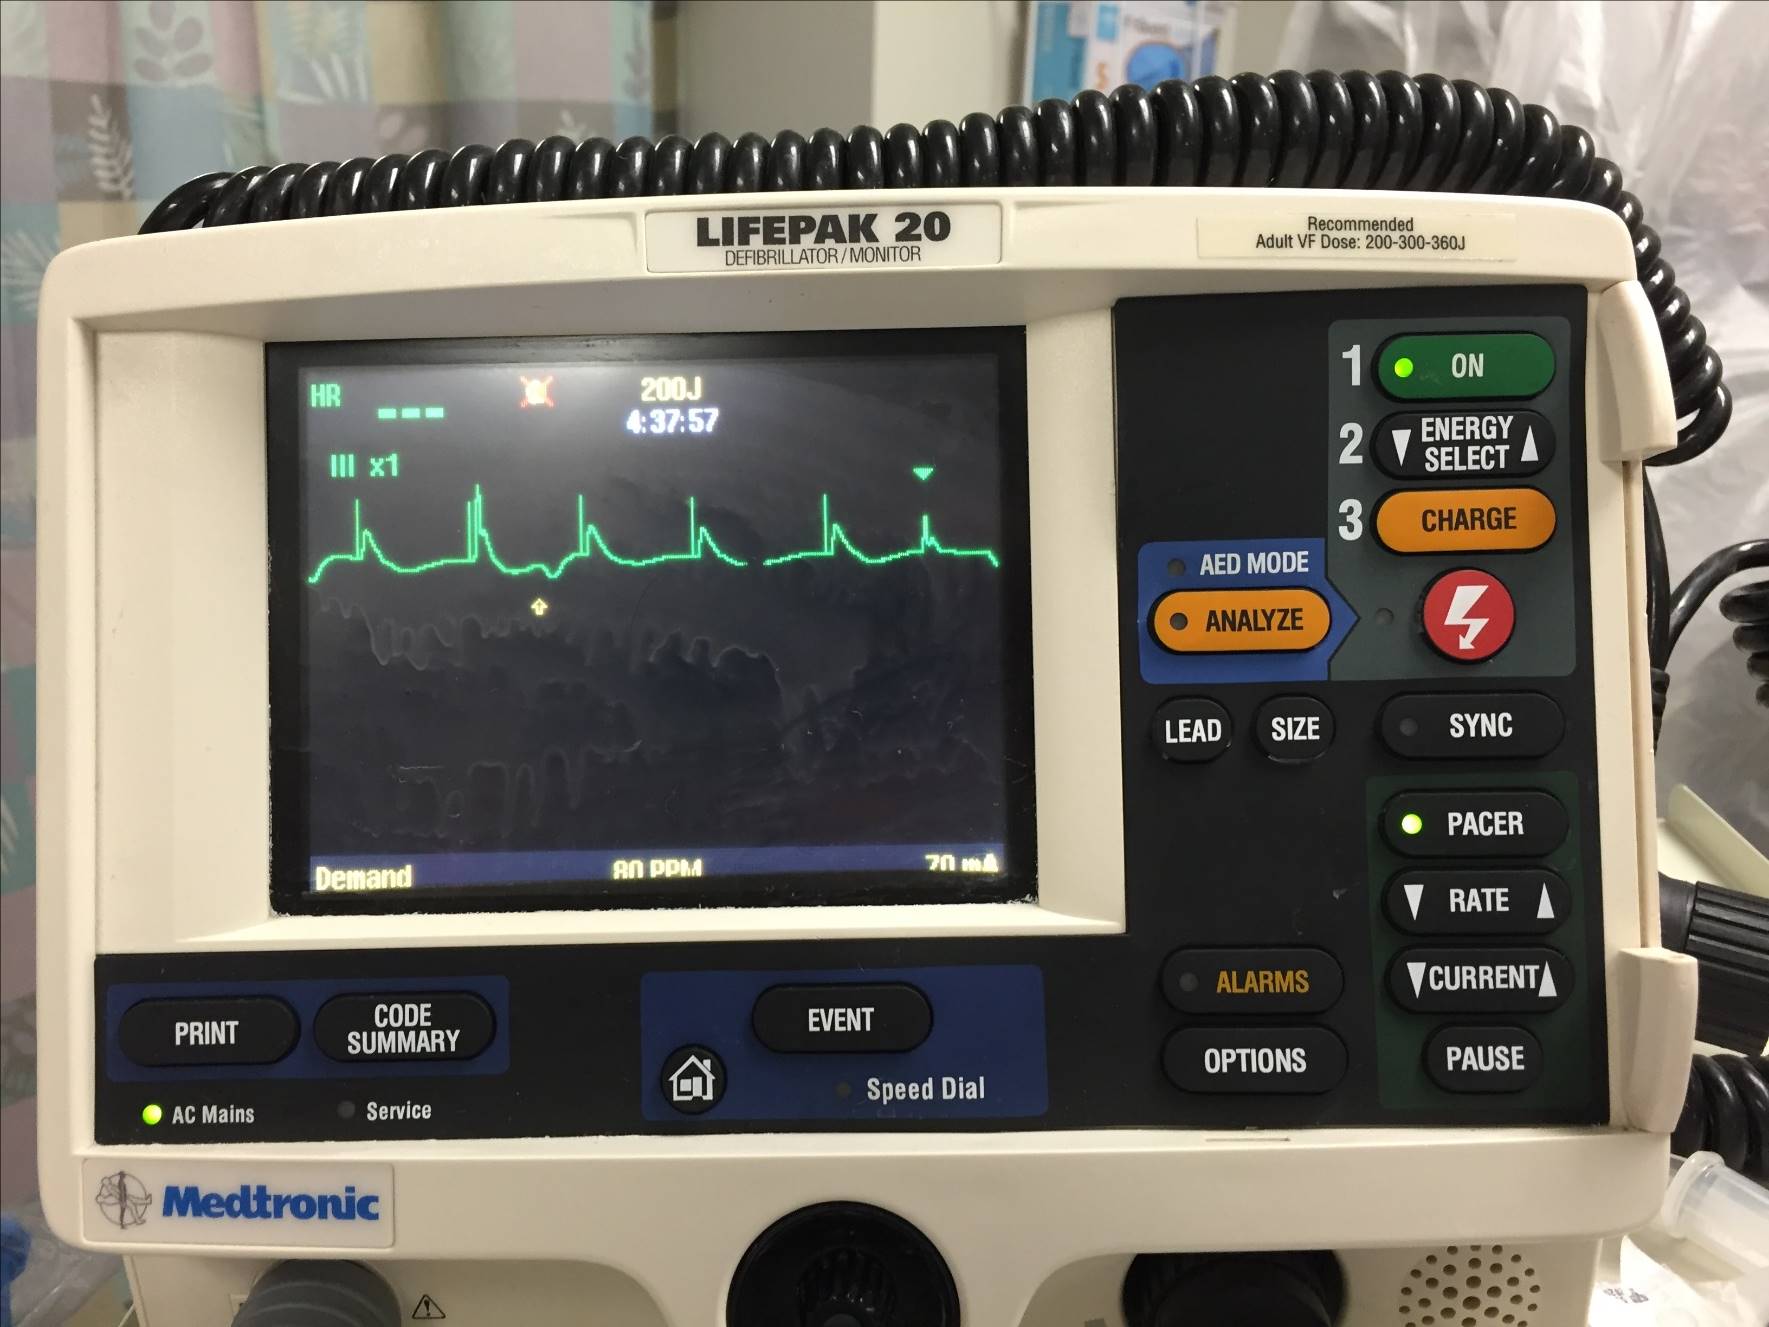 Figure 8. Monitor displaying mostly captured beats.
b. Image above demonstrates spikes that are now capturing the ventricle more often. Only one sensing arrowhead can be seen denoting a native rhythm.
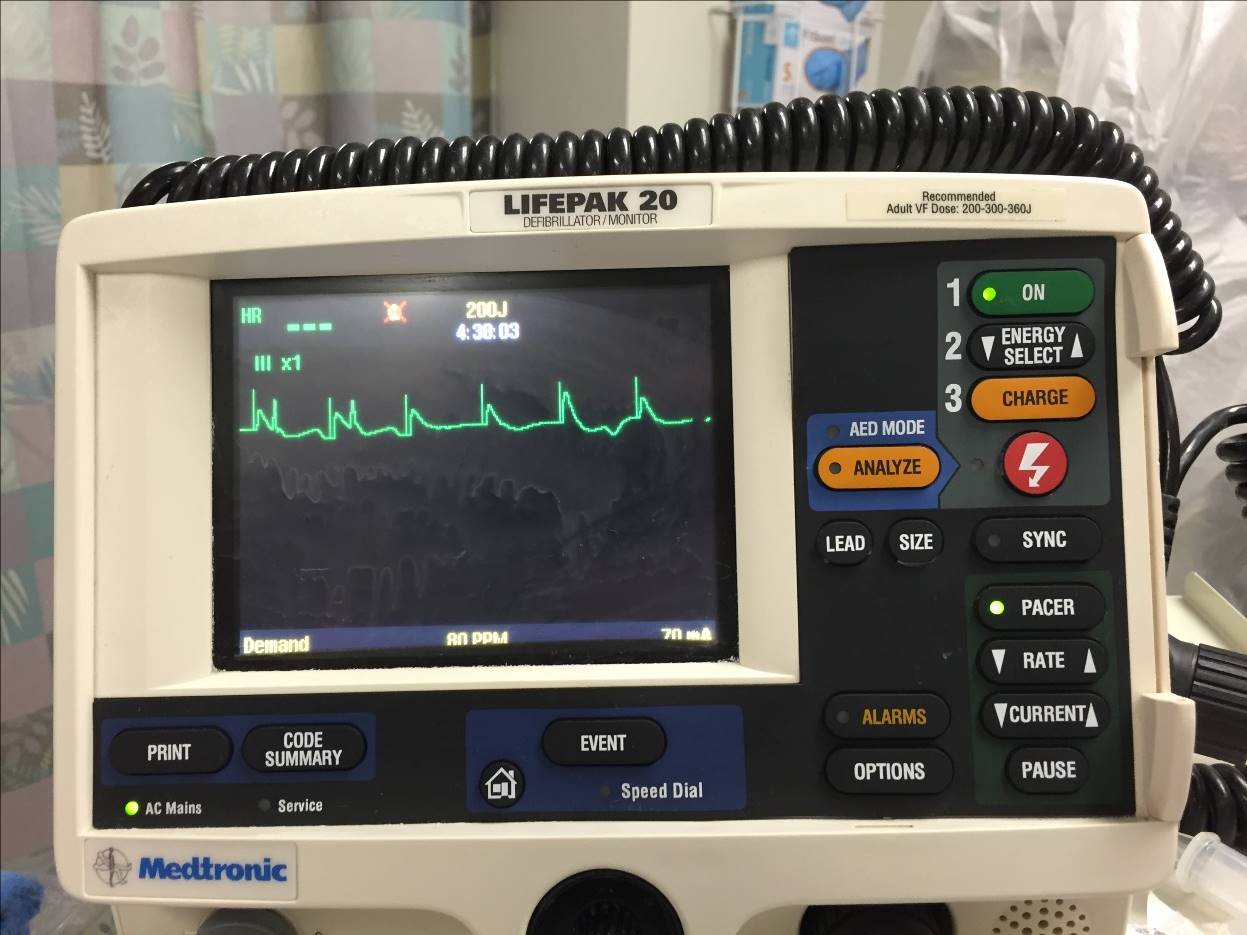 Figure 9. On the monitor, every QRS complex is a captured beat.
c. Image above now demonstrates full capture as each pacer spike is followed by a QRS complex.
7. Assess mechanical capture after electrical capture has been demonstrated on the monitor. Mechanical capture is when the heart contracts with the paced QRS complexes. Mechanical capture can be demonstrated by evidence of improved cardiac output, such as a palpable pulse that matches captured beats, rise in blood pressure, improved level of consciousness, assessing the waveform on the pulse oximetry, and improved skin color. Mechanical capture can also be assessed via bedside ultrasound of the heart by directly visualizing ventricular contractions. It is possible to have electrical capture, but not mechanical capture. Thus, it is instrumental to assess both electrical and mechanical capture.
A video describing how to transcutaneously pace is in the link below:
Transvenous Pacing
Transvenous Pacing (TVP) requires central venous access. Transvenous pacing is indicated if:
Transcutaneous pacing did not achieve mechanical capture. In this case, the chest may twitch but you will not see Left Ventricle contracting at the same rate on bedside ECHO.
If transcutaneous pacing was effective; but the patient is uncomfortable due to the electrical shocks and is too unstable for sedation.
Transvenous pacing has advantages over transcutaneous pacing such as increased patient comfort, less pain, and better stability of pacing wires. However it takes more time to set up, hence it usually follows transcutaneous pacing.
Risks include:
Myocardial perforation (less likely with balloon tipped catheter). This can present as pericardial tamponade
Arrhythmias - watch for these on the monitor
Misplacement and failure to capture - likely the tip is not in the RV and will need repositioning.
All risks associated with central venous catheter placement - infection, pneumothorax, thrombosis etc
Other situations for using pacing:
Persistent ventricular tachycardia can be treated with overdrive pacing. Overdrive pacing can terminate the ventricular tachycardia by pacing the patient faster than their intrinsic rate, which causes the paced rhythm to overtake the ventricular tachycardia.
Failure of a previously implanted internal pacemaker could require emergent pacing.
Preferred sites for insertion are right Internal Jugular and left Subclavian veins. These have the straightest anatomical route to the Right Ventricle. Appropriate placement of the tip of the pacing wire is at the apex of the right ventricle. The right IJ is generally the most preferred as it saves the left subclavian for a permanent pacer.
Cardiology can perform TVP under fluoroscopy using ECG guidance or using specialized flexible semi-floating catheters with a balloon on the tip. In the Emergency Department, Emergency Medicine physician usually place it using flexible semi-floating catheters with a balloon on the tip.
Please review the following video for details of the procedure and review the steps below the video.
Steps for Transvenous Pacing
Identify the vessel on ultrasound or via landmarks
Gown and drape patient in sterile fashion
Anesthetize the area
Insert an introducer needle under ultrasound guidance until you are in the internal jugular and see venous blood return
Remove the syringe, insert guidewire through the needle into the vessel
Remove the needle, without EVER letting go of the wire
Incise the skin by the wire with an #11 blade
Advance the sheath over the wire into the vessel lumen with a twisting motion
Remove the guidewire
Verify the sheath is in the vessel lumen using ultrasound.
Insert and advance the pacing catheter approximately 10 cm (to make sure it is past the introducer) and inflate the balloon
Slowly advance the pacing catheter; looking at the ECG tracing that is being run during the procedure. Stop advancing when the complexes show ST- elevation, indicating that the tip is abutting the right ventricle
Connect the pacemaker generator to the catheter
Adjust pacemaker output to minimum amount required to capture
Examine chest x-ray for appropriate catheter placement
Secure the catheter and apply sterile dressing
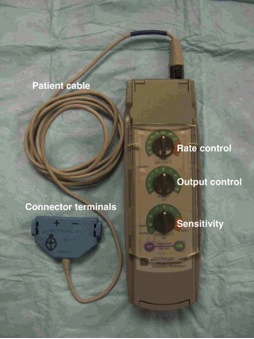
Figure 10. Pacer Generator and its components. Image used with permission and courtesy of James P Sarwark, MD and Andrew Pirotte, MD
For additional information about transvenous pacing, you can review the following article about transvenous pacing:
Synchronized Cardioversion and Defibrillation
Synchronized cardioversion and defibrillation both use electrical shocks to the myocardium to convert an abnormal heart rhythm into normal sinus rhythm. Synchronized cardioversion is timed with the patient’s heart rhythm to ensure that the shock does not precipitate ventricular fibrillation (“R on T phenomenon”). It does this by delivering the electrical shock during the R wave. Synchronized cardioversion should only be performed on a patient with a pulse.
Defibrillation is not synchronized with the native heart rhythm, and the shock delivered is of higher amplitude compared to the synchronized cardioversion. Defibrillation should only be performed on patients who are pulseless, and classically with patients with ventricular tachycardia or ventricular fibrillation.
Defibrillation | Synchronized Cardioversion | |
Timing of shock | Unsynchronized | On the R wave |
Does the patient have a pulse? | No | Yes |
Energy (biphasic) | 200J | 50-100J |
Table 1. Synchronized vs unsynchronized cardioversion.
For all patients with tachycardia, the first step is to determine if the patient has a pulse. The next step is to determine if the tachycardia is wide complex (QRS width greater than 0.12 seconds) or narrow complex (QRS width less than 0.12 seconds).
If the patient is pulseless with a wide complex tachycardia, proceed to defibrillation while initiating ACLS. Do not delay defibrillation for chest compressions, as early defibrillation is associated with improved outcomes.
If the patient is pulseless with a narrow complex tachycardia - follow the PEA (pulseless electrical activity) pathway of ACLS.
If the patient has a hemodynamically unstable tachydysrhythmia (examples include atrial fibrillation, supraventricular or ventricular tachycardia) or if medications like adenosine have not been successful, the next step is synchronized cardioversion.
Both defibrillation and synchronized cardioversion use a defibrillator to deliver an electric shock to the chest. Defibrillation machines can be either monophasic or biphasic. Biphasic defibrillators sends the electricity in two directions between the pads, whereas monophasic send electricity in one direction. Most current defibrillators utilize a biphasic waveform that allows for a lower energy level to be used to achieve effective cardioversion. Because of their greater ability to terminate ventricular dysrhythmias, defibrillators utilizing biphasic waveforms are preferred to those utilizing the older, monophasic waveform.
Synchronized cardioversion differs from defibrillation in two aspects
The amount of energy needed to convert the rhythm is usually less than that required for defibrillation.
The shock is delivered in a different part of the cardiac cycle.
Synchronized Cardioversion
Cardioversion refers to the synchronized delivery of electrical energy used to depolarize the cardiac cells to stop a tachyarrhythmia in a patient with a pulse. The electrical impulse is timed by the machine to the patient’s ECG, and is delivered at the peak of the R wave. This is to prevent the shock from being given during a refractory period (R on T phenomenon), which could precipitate ventricular fibrillation.
Rhythms that should be cardioverted (in the setting of an unstable patient with a pulse) include:
Ventricular Tachycardia
Supraventricular tachycardia, this includes:
Atrioventricular Nodal Reentrant Tachycardia(AVNRT)
Atrioventricular Reentrant Tachycardia(AVRT)
Atrial Fibrillation
Atrial Flutter
To perform synchronized cardioversion,
Place the defibrillator in the “synchronize” mode. This causes the monitor to track the R wave of each QRS complex that goes by. A synchronizing marker will appear above each QRS complex, indicating that the synchronize feature is active.
Select the appropriate energy level.
Lower energy is typically required to restore sinus rhythm when compared to defibrillation (Typically starting with 50-100 Joules when using a biphasic defibrillator). However, if the first attempt fails, it is reasonable to double the amount of Joules for the next shock.
Press and hold the discharge/shock button.
When delivering a shock by synchronized cardioversion, the “shock” button may need to be held down until the shock is delivered so that the device can be sure that the charge is delivered in a synchronized manner. Repeated cardioversion attempts will likely require the operator to repress the sync button after each cardioversion attempt.
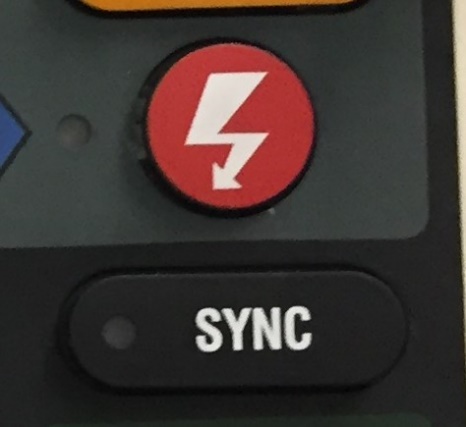
Figure 11: Sync button and “Shock” button (red button) on a defibrillator machine
Defibrillation
Defibrillation refers to non-synchronized delivery of electrical energy used to depolarize the cardiac cells with the goal of resetting the cardiac threshold and letting the heart restore normal rhythm. This is only used for patients without a pulse. If the patient has a pulse, then synchronized cardioversion should always be used to treat unstable dysrhythmias.
When a patient is defibrillated, the shock is delivered instantaneously at whatever point the cardiac cycle happens to be in.
Rhythms that should be defibrillated (in the setting of a patient without a pulse) include
Ventricular Tachycardia
Ventricular Fibrillation
To perform defibrillation:
Once the pads are in place, charge the defibrillator
Clear the patient
Press the shock button to shock the patient
Resume CPR immediately
Note: Follow the ACLS algorithm for medication administration and CPR
Implanted Permanent Pacemakers
Pacemakers are used to treat various bradyarrhythmias and heart failure by providing an appropriate heart rate and heart rate response to other factors (ie exercise).
Permanent pacemakers Indications
Symptomatic bradycardia (rate less than 40 or frequent sinus pauses)
Symptomatic chronotropic incompetence (i.e., not having an appropriate heart rate response to exercise
Third degree AV block
Mobitz II second degree AV block
Permanent pacemakers (PPMs) are implanted by cardiac electrophysiologists. The basic components of a PPM are the pulse generator and the leads. The pulse generator is implanted subcutaneously and is connected to leads, which are threaded through the subclavian vein into the heart. Pacemakers can be single-chamber (one lead for both chambers), dual-chamber (two leads for upper and lower chamber), or biventricular. Each lead senses the native electrical activity in that cardiac chamber, and sends these signals back to the pulse generator, which is programmed to evaluate the intrinsic electrical activity of the heart and deliver a pacing impulse when necessary.
A pacemaker is programmed in one of several modes, which determines its pacing and sensing functions. The mode is identified by a three to five letter coding system shown below - the first 3 are most relevant for EM physicians.
| 1st letter: Chamber Placed | 2nd letter: Chamber Placed | 3rd letter: Chamber Placed | 4th letter: Chamber Placed | 5th letter: Antitachydysrhythmia Function |
| Ventricle Atrium Dual(V+A) O: None | Ventricle Atrium Dual(V+A) O: None | Triggers Inhibits Dual(V+A) O:None | P: programmable rate output or both M: multiprogrammable rate, output, sensitivity C: communicating R: Rate Modulation O: None | P: antitachydysrhythmia pacing S: Shock D: Dual(P+S) O: None
|
Table 2. Components of pacemaker programming
Complications of implantation occur in the first 6 weeks of the procedure:
Infection
Venous thrombosis of the upper extremity
Superior vena cava syndrome
Hemothorax/Penumothorax
Pocket Hematoma
Evaluating Pacemakers in the ED
EKG: evaluate sensing (pacer spikes present), capture and appropriate pacing
Chest Xray:
Evaluate lead position(compare to prior CXR if available)
Evaluate lead fracture (common fracture site is between first rib and clavicle)
Manufacture code can be found on the pulse generator
Device interrogation: Done by cardiology or representative of the company that makes the particular patient’s device. All stored information about the patient’s intrinsic electrical activity can be obtained, and all programmed settings can be evaluated.
Pacemaker Magnet: Placing a magnet over the pulse generator allows you to turn off the sensing function of the pacemaker and put it in the VOO fixed rate pacing mode (usually around 70 bpm)
Types of Pacemaker Malfunction
- Failure to pace: absence of pacemaker spikes in a patient whose intrinsic rhythm is slower than the programmed rate. This can be caused by:
Lead fracture or dislodgement
Battery Depletion
Oversensing: Inappropriate sensing of electrical noise that is mistaken for intrinsic electrical activity, which therefore inhibits pacing. This can be corrected by re-programming the device. *This is the most common cause of failure to pace!
- Failure to sense or capture: pacemaker spikes at the wrong time or no QRS after pacer spike.
Lead Malposition: Lead displacement(~first month after placement) or cardiac perforation(~ 4 days)
Wire or Insulation Fracture
Battery Depletion
Elevated Myocardial Threshold
Fibrosis at electrode
Electrolyte abnormalities
New bundle branch block or Ischemia
Undersensing: Failure of device to recognize normal intrinsic electrical activity, which therefore results in unnecessary paced beats. This can be corrected by reprogramming the device
Oversensing: (See above)
- Pacemaker-Mediated Tachycardia
Reentrant tachycardia triggered by premature beat similar to AVNRT or AVRT, but using pacemaker as part of the reentrant loop
Only seen in dual chamber pacemakers
Modern pacemakers are typically programmed in ways designed to minimize likelihood of this happening and to terminate the circuit if it is detected by the device.
Treat with a magnet
Internal Cardiac Defibrillators (ICD)
ICD are devices that can deliver electrical impulses to terminate lethal ventricular dysrhythmias (ventricular tachycardia and ventricular fibrillation). They consist of a pulse generator with a capacitor and lead systems containing sensing and shocking electrodes. ALL ICDs CAN BE PROGRAMMED TO PACE, but pacemakers cannot defibrillate. In comparison to a PPM, an ICD system requires a specialized right ventricular lead and a different pulse generator.
An ICD can perform the following functions to terminate a ventricular dysrhythmia.
Defibrillation is a high energy electrical shock that is delivered after detection of VF or fast VT. This is very uncomfortable for patients.
Cardioversion is a low energy electrical shock that is delivered after detection of VF or VT.
Anti-tachycardia pacing is a therapy to treat slower VT without a shock. The device delivers an 8-10 beat burst of ventricular pacing at a rate faster than the intrinsic VT in an attempt to capture the ventricle and terminate the intrinsic VT. Most devices will attempt this and then give a shock if the therapy is unsuccessful. Antitachycardia (overdrive) pacing can also degenerate VT into VF, which would then require the device to defibrillate urgently.
Indications for ICD
There are several indications for ICDs. Below listed are a few.
Patients with prior sudden cardiac death
Brugada Syndrome
Ischemic cardiomyopathy or Heart Failure with EF<35%
Long QT SYndrome
Hypertrophic Familial Cardiomyopathy associated with sudden death
Types of ICD Malfunction
- Failure to defibrillate true VT/VF.
Could rarely be due to a malfunction of the device or lead
Most commonly, the device is “working appropriately” but the patient’s arrhythmia does not meet the programmed criteria necessary to initiate treatment. For example, an ICD might be programmed so that it will only defibrillate VT if it is detected at greater than 180 beats per minute for 20 seconds. If the patient has VT at 179 beats per minute or terminates on its own after 19 seconds then the device would not deliver a shock.
- Frequent ICD Discharge. Must determine whether shocks were appropriate or inappropriate.
Frequent episodes of VT/VF, which would require further medical workup.
Inappropriate shocks: Device mistakes electrical artifact for VF or misinterprets SVT as VT. This can also occur with lead fracture or picking up muscular contractions or SVT
Ghost shocks: patient feels shocks when there aren’t any
For an awake patient who is obviously getting inappropriate shocks, ICD can be disabled by placing magnet over the device.
- Infection
At the implantation site
May necessitate lead extraction
Pearls and Pitfalls
Antiarrhythmic medications and even electricity can cause lethal rhythms. Be prepared to run a full resuscitation code every time.
When transcutaneous pacing, ensure that BOTH electrical AND mechanical capture is obtained. Since transcutaneous capture can frequently fail, it is wise to prepare for transvenous pacing.
Preferred sites for transvenous pacer insertion are right Internal Jugular and left Subclavian veins.
Cardioversion is for patients with a pulse, and defibrillation is for patients without a pulse.
Oversensing is the most common cause of failure to pace in a pacemaker.
All ICDs can be programmed as pacemakers, but pacemakers cannot defibrillate
Case Study Resolution
You determine that the patient has unstable ventricular tachycardia given the evidence of end-organ damage and decide to provide synchronized electrical cardioversion. The patient is provided with biphasic electrical cardioversion at 100J and the patient converts into sinus rhythm. Her blood pressure improves to 110/70 mm Hg and her mentation improves to baseline. The patient is transferred to the CCU where she does well. She is discharged home with an implanted AICD and she is neuro intact.
References
Ali A. Sovari, Paria Zarghamravanbakhsh, Michael Shehata, 43 - Temporary Cardiac Pacing, Editor(s): David L. Brown, Cardiac Intensive Care (Third Edition), Elsevier, 2019, Pages 456-460, ISBN 9780323529938, https://doi.org/10.1016/B978-0-323-52993-8.00043-6.Hayes, D. Temporary Cardiac Pacing. In: UpToDate, Updated: Oct, 2015, UpToDate, Waltham, MA. (Accessed on March 2015.)
Goyal A, Sciammarella JC, Chhabra L, et al. Synchronized Electrical Cardioversion. [Updated 2022 May 22]. In: StatPearls [Internet]. Treasure Island (FL): StatPearls Publishing; 2022 Jan-. Available from: https://www.ncbi.nlm.nih.gov/books/NBK482173/
Roberts, JR, Hedges, JR. Ch 15 Emergency Cardiac Pacing in Clinical Procedures in Emergency Medicine, 5th ed. Elsevier, Philadelphia, PA. 2010.
Stahmer SA. Chapter 58. Bradyarrhythmias. In: Adams, JG et al. Emergency Medicine Clinical Essentials, 2e. Philadelphia,PA: Elsevier; 2013.
Sullivan B, Bartels K, and Hamilton N. Insertion and Management of Temporary Pacemakers. SEMIN CARDIOTHORAC VASC ANESTH March 2016 20: 52-62.
Syverud, SA, Dalsey, WC, Hedges, JR. Radiographic Assessment of Transvenous Pacemaker Placement during CPR. Ann Emerg Med. 1986; 15:131.Knight, B. Basic Principles and Techniques of Cardioversion and Defibrillation. In: UpToDate, Updated: August, 2014, Waltham, MA.(Accessed on March 2015)
Tintinalli JE, Kelen GD, Stapczynski JS, Ma, OJ, Cline DM, editors. Tintinalli’s Emergency Medicine. 7th ed. New York: McGraw Hill; 2011. Cardiac Pacing and Defibrillation and Carioversion; pgs 240-250.
Permissions for Images:
Ekg strips from Life in the Fast Lane http://lifeinthefastlane.com/; reproduced with permission
Transvenous picture use with permission courtesy of James P Sarwark, MD and Andrew Pirotte, MD