
Chest Radiograph
Author Credentials
Written by: William Krantz, MD, West Virginia University School of Medicine (Original Version)
Editor: Briona Butcher, MD and Sarah Bezek, MD, Baylor College of Medicine Henry J. N. Taub Department of Emergency Medicine (2023 update). Matthew Tews, DO, MS, Medical College of Wisconsin, Department of Emergency Medicine (Original Version).
Section Editor: Navdeep Sekhon, MD. Baylor College of Medicine.
Update: 1/2023
*Image attribution – images within this chapter are attributed to Dr. William Krantz, MD, unless otherwise specified
Case Study
A 55 year old female with a history of metastatic ovarian cancer presents to the Emergency Department with a three day history of worsening shortness of breath. When she arrives to the ER she is dyspneic and breathing 45 times a minute. The patient is quickly roomed, placed on a non-rebreather, and vital signs are obtained. Her vital signs show a Temperature of 99.5°F, Pulse of 140 beats per minute, Blood Pressure of 88/50 mm Hg with a Pulse ox of 90% on a non-rebreather.
You are her physician, and are a little worried about her. You listen to her lungs and note absent breath sounds on the left. You call the xray tech to do a stat chest xray and are planning your next steps.
Objectives
By the end of this module, the student will be able to:
Identify details to verify when looking at radiologic imaging
Assess adequacy of chest radiographs
Develop a systematic approach to reading chest radiographs
Identify important signs to know when reading chest radiographs
Utilize the CXR to aid in diagnosis in emergent clinical situations
Introduction
Every Emergency Medicine physician has to be adept at reading chest radiographs quickly and accurately, as it can help the Emergency Medicine physician save lives and prevent morbidity. Examples of life threatening diagnoses that can be diagnosed quickly via chest xray include:
Pneumothorax
Hemothorax
Pneumomediastinum
Pleural Effusions
Volume Overload
Pneumonia
In order to be able to accurately interpret chest radiographs, it is useful to have a structured approach to reading chest xrays.
But before we interpret a chest xray, is is helpful to check the following:
Verify patient
Assess adequacy of the film
Projection
Rotation
Inspiration
Penetration
We will go into more details regarding assessing the above in the following paragraphs.
Section 1: Verify Details
It is always essential to verify patient details on every study you review to ensure diagnostic accuracy and patient safety.
Patient – Ensure the study was performed on the correct patient.
Time and date – Note the time and date of the study. This is especially important if there are comparison studies. By convention, the older study is displayed on the left, though this is not always the case.
Study type – Verify the type of study performed. Sometimes a study will be changed depending on the patient's ability to tolerate various views. For example, an anterior-posterior (AP) supine may be done on a patient that has difficulty standing for a posterior-anterior (PA)/lateral chest x-ray (CXR).
Comparisons – Make sure you view every image submitted. It is not uncommon for multiple views to be taken for an AP/supine CXR study when acquiring the images is technically challenging – for example in a patient with traumatic injury. It is important to compare these images to prior studies, if available.
Section 2: Assess Adequacy
Projection
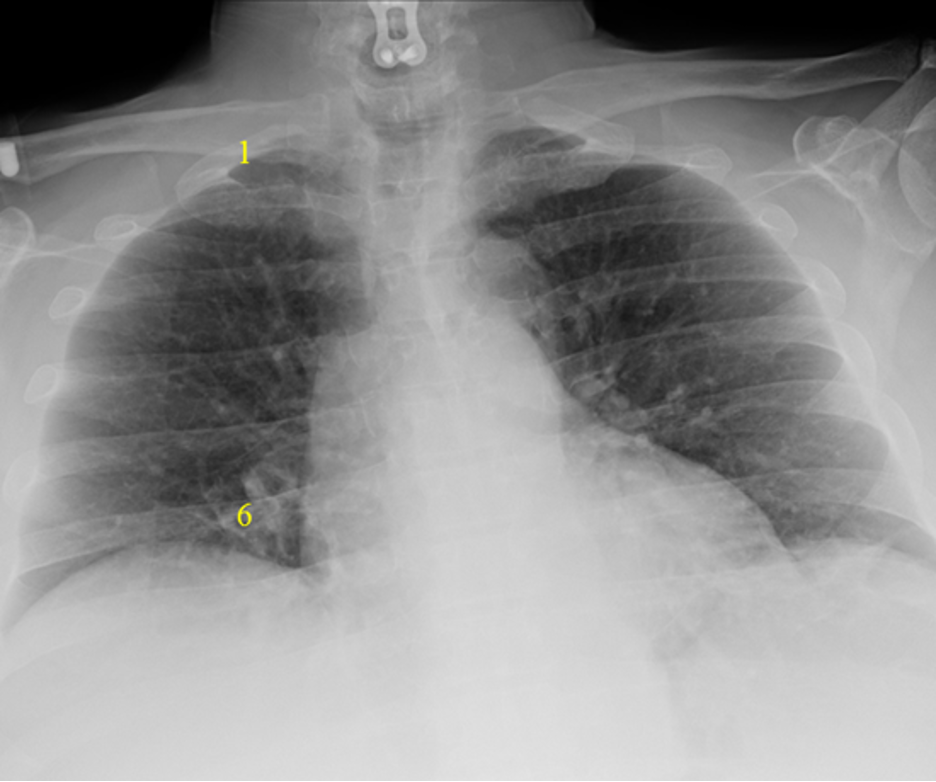
PA/lateral projection is the standard used for most patients who are ambulatory and able to stand. In this view, the mediastinum should have a normal width and a good inspiratory effort should result in full diaphragm expansion.
 Figure 1. PA Projection – Normal Mediastinum and Good Inspiratory Effort
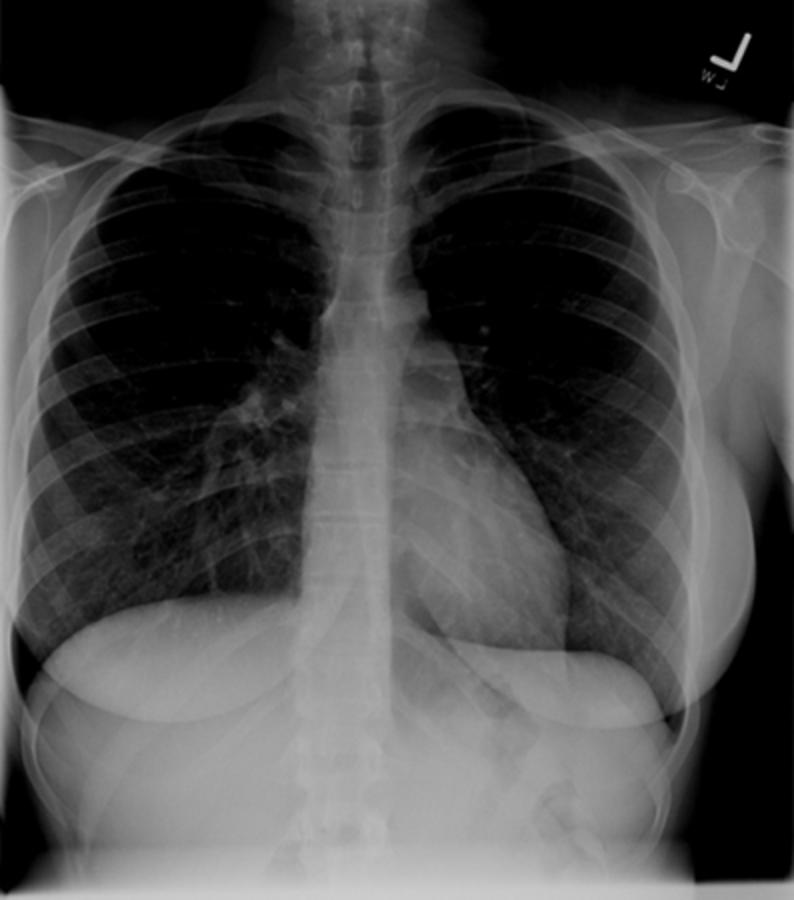
AP projection, on the other hand, is obtained with the patient in bed, lying flat, or partly upright. This is how most portable chest xrays are obtained. It is usually reserved for non-ambulatory patients or where the xray need to be done emergently.
AP projections have the disadvantage of making the heart and mediastinum appear more prominent and appear larger (can make it hard to assess for cardiomegaly). Additionally, because patients may have shallower inspiration when supine, this view can limit evaluation of the lung bases. Additionally, a lateral projection is not obtained with an AP projection, thereby limiting the view of the chest further.
If possible, it is preferable to order a PA/lateral CXR over an AP view.
 Figure 2. AP Projection – Widened Mediastinum and Less Inspiratory Effort
Rotation
It is not uncommon, especially for AP supine CXRs, for the patient to be slightly rotated. Rotation can be assessed by measuring the distance between the medial edges of the clavicles to the vertebral spinous processes. They should be equal or near equal. Anterior structures move the same direction as rotation so the clavicle/spinous process width is increased on the side to which the patient is rotated. This patient is rotated to the left.
 Figure 3. Note the increased clavicular head to spinous process distance on the Left. Red Dotted Line = Slight Rotation to the Left.
Here is a patient severely rotated to the left. Severe rotation can alter the normal cardiomediastinal contour and make interpretation difficult.
 Figure 4. Significant Rotation to the Left
Inspiration
Deeper inspirations show more lung and result in better overall images with less haziness at the lung bases and less enlargement of the heart and mediastinum. A good inspiration on a PA CXR shows at least 9 posterior ribs.
The following films were of the same patient and taken using the same AP projection. The image on the left is a poor inspiratory effort (ribs 1-6), while in the film on the right, the patient achieved a much deeper inspiration on the bottom x-ray (ribs 1-10). Note how much better you can assess the lung fields and mediastinum with adequate inspiration
 |  |
Poor Inspiratory Effort Good Inspiratory Effort
Figure 5. Poor versus good inspiratory effort.
Penetration
Under-penetration results from not enough x-rays passing through to allow differentiation of dense structures, thus the mediastinum and spine appear white. In an over-penetrated CXR too many x-rays have passed through the chest preventing differentiation of low density structures, thus the lung fields appear black. With proper penetration, the spine should be faintly visible behind the heart.
 |  |  |
Under-penetrated Over-penetrated Correctly penetrated
Figure 6. Assessing penetration of Chest Xray.
Section 3: Develop Systematic Approach
It is important to develop a system for looking at imaging and be consistent in its use. Using the same methodical approach every time gives one a way to reduce errors. Different systems exist, whether it is based on anatomical structure (looking at one structure, then another, and so on) or scanning the image in a pattern (back and forth from top to bottom). No system is the best. What is important is finding one that you like and using it consistently. Resist the natural tendency to focus in on the area which first catches your eye otherwise you may miss the more important subtle finding. You can improve diagnostic accuracy and reduce bias by utilizing a systematic approach each and every time.
ABCDs
The ABCDs approach is taught as an aid for remembering steps in many different learning environments. It can be applied in interpreting chest xrays too. The mneumonic starts with A and can go through H.
A – Airway | E – Effusion |
B – Bones | F – Fields/Foreign Bodies |
C – Cardiac | G – Gastric |
D – Diaphragm | H – Hila |
Table 1. ABCD approach to reviewing CXRs.
A – Airway
Identify trachea and note if it is midline and straight. A deviated trachea can be caused by many etiologies including rotation, masses and tension pneumothorax.
Identify carina and estimate the angle. Normally it is 60-100°. Common things that may increase this angle include left atrial enlargement and adenopathy.
Trace out right and left mainstem bronchi.
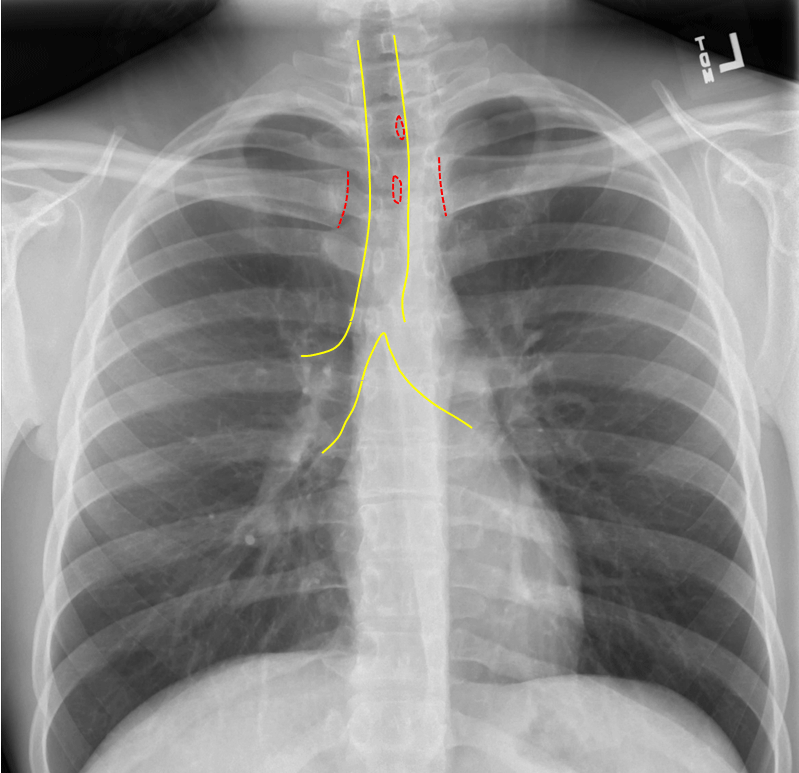
Figure 7. Trachea midline: yellow; Spinous process and medial clavicles: red. This patient is slightly rotated right.
 Figure 8. Leftward tracheal deviation due to large substernal goiter
Endotracheal tubes
Endotracheal tube (ETT) tip should sit 3-5cm above the carina. The ETT can be too high above the carina and will need to be advanced, or too deep into the right mainstem and need to be pulled back
 Figure 9. Intubation with Good Position of ETT
Red = ETT; Yellow = Trachea and Bronchi
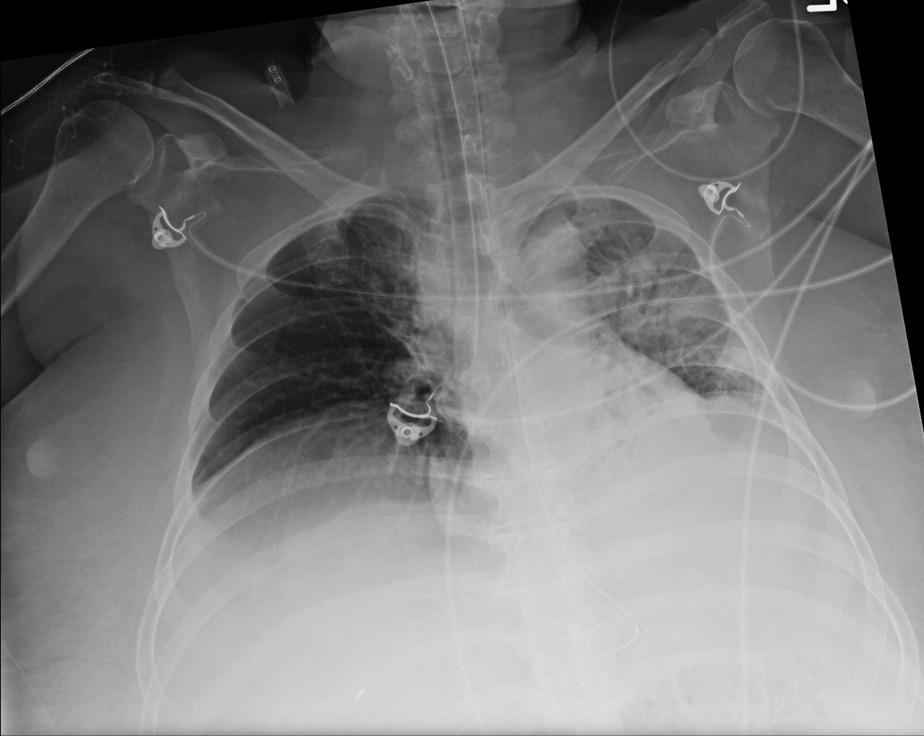
 Figure 10. Right mainstem bronchus intubation. Lower image with endotracheal tube outlined.
B – Bones
Evaluate clavicles, AC joints, glenohumeral joints and humeri followed by the ribs and vertebrae.
 Figure 11. Normal Alignment of Clavicle, Glenohumeral Joint and
Proximal Humerus on a PA View of Chest
Figure 11. Normal Alignment of Clavicle, Glenohumeral Joint and
Proximal Humerus on a PA View of Chest

Figure 12. Subtle Anterior Shoulder Dislocation - The humeral head (solid yellow line) is out of the glenoid fossa (dotted yellow line)
Sometimes, overlying structures on the radiograph can obscure positive findings. If there is suspicion of an injury or abnormality in the region of overlying structures (such as cords, belts, jewelry), make sure to remove them and repeat the radiograph
 Figure 13 “Normal” Chest Radiograph at First Glance. However, note cardiac monitor cords over the distal clavicle
 Figure 14. Distal Clavicle Fracture - The film shows a distal clavicle fracture when the monitor cord is removed. Rib fractures can sometimes be extremely subtle. Be sure to trace all the
ribs to identify step offs.
Figure 14. Distal Clavicle Fracture - The film shows a distal clavicle fracture when the monitor cord is removed. Rib fractures can sometimes be extremely subtle. Be sure to trace all the
ribs to identify step offs.
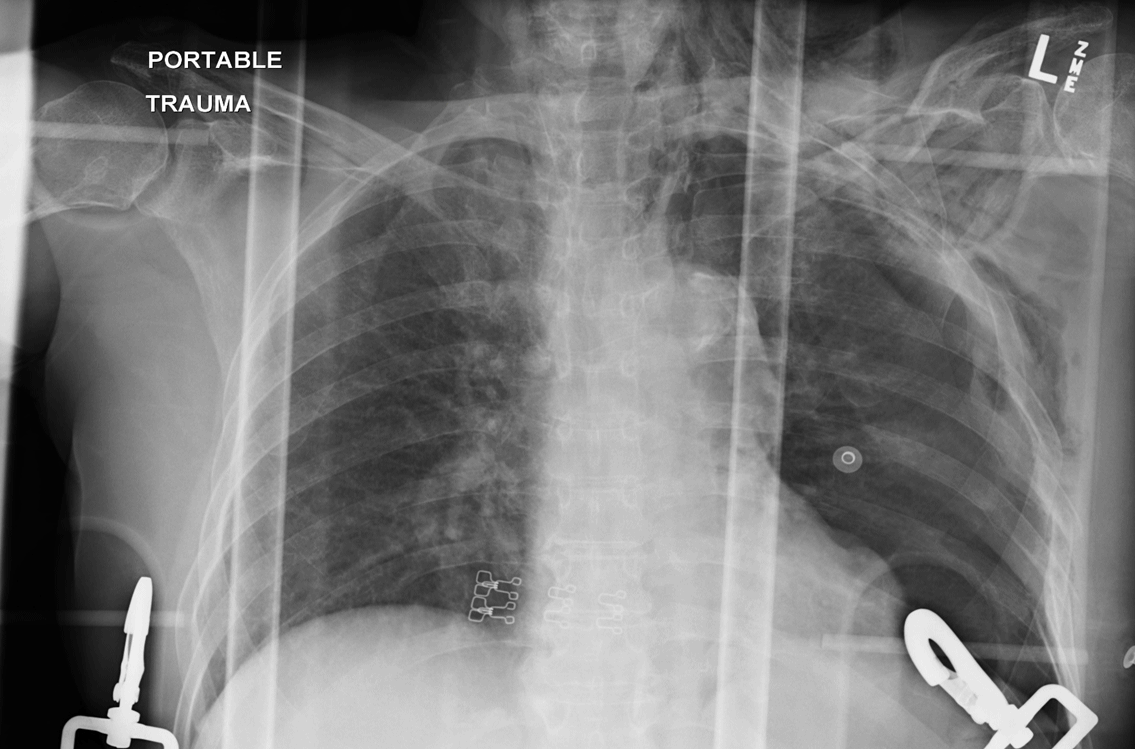 Figure 15. Left Sided Upper Rib Fractures - A useful trick can be to flip the image upside down or sideways which makes the ribs appear to stand out.
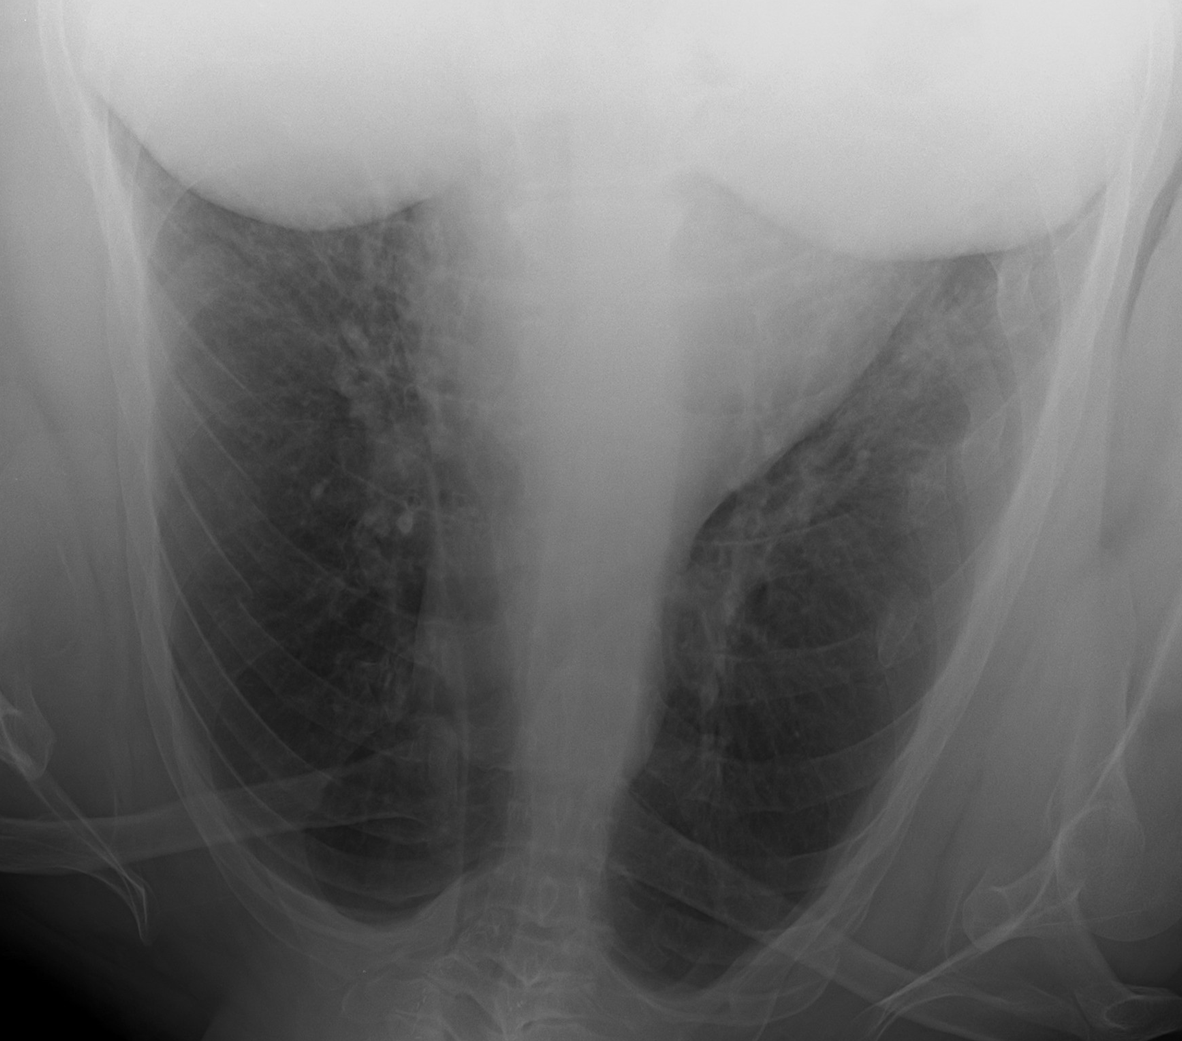 Figure 16. Left Sided Rib Fractures - Visualize the entire spine and look for vertebral body height loss and alignment
 Figure 17. L1 Compression Fracture = Red; T11 and T12 Normal Body Height (Yellow)
C – Cardiac
Next, check the cardiac size: normal is <50% of thoracic diameter on PA projection and <55% on AP projection.
 Figure 18. Normal Cardiac Size on PA CXR
Red = thoracic diameter; Yellow = cardiac diameter
Verify cardiac borders are sharp and defined. Evaluate aorta and AP window (should be concave)
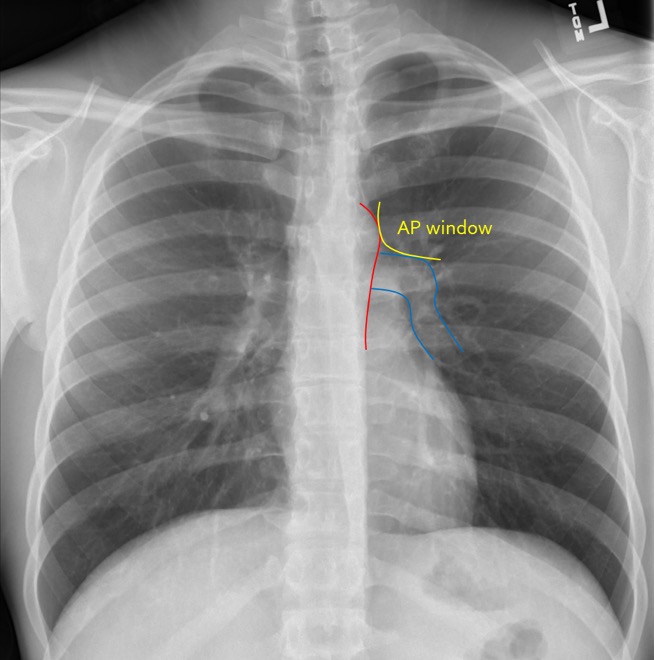 Figure 19. Normal AP Window and Cardiac Border
Red = Aortic contour; Blue = Upper cardiac border; Yellow = AP window
D – Diaphragm
Verify diaphragm and costophrenic angles are sharp and well defined.
 Figure 20. Sharp Diaphragmatic Angles = Yellow
Note any flattening of diaphragm which may indicate hyperexpanded lungs such as seen in a patient with COPD.
 Figure 21. Flattened Diaphragm in COPD = Yellow
Obscuration of all or a portion may indicate pleural effusion or consolidation.
 Figure 22. Left Sided Pleural Effusion - note blunting of costophrenic angles.
 Figure 23. Free Air Under Diaphragm = Yellow. Always important to look for free air under diaphragm on upright
projections.
Figure 23. Free Air Under Diaphragm = Yellow. Always important to look for free air under diaphragm on upright
projections.
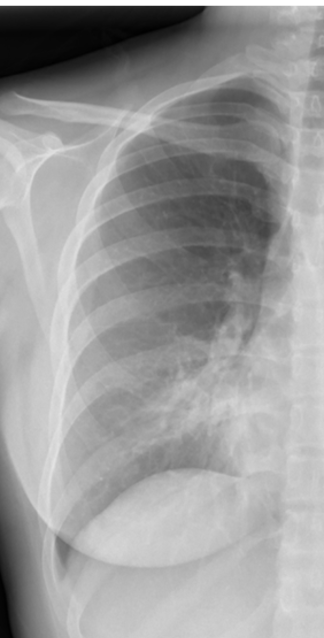
E – Effusion
Look for ‘blunting’ of the costophrenic angles on PA projection and posterior costophrenic sulcus on lateral projection. As much as 300-500cc of fluid may not be seen on PA projection, but seen on lateral projection.
 Figure 24. Pleural Effusion on Lateral View
Fluid may track into the right minor fissure causing it to thicken or even form a pseudotumor.
 Figure 25. Right Minor Fissure Fluid - Loculated effusion may present as nondependent pleural thickening
or air fluid level.
Figure 25. Right Minor Fissure Fluid - Loculated effusion may present as nondependent pleural thickening
or air fluid level.
 Figure 26. Right Sided Loculated Effusion
F – Fields/Foreign bodies
Lung fields should generally be uniformly dark grey. Should look for appropriate lung markings and be in-tuned to any masses, consolidations, paucity of lung markings. Always be mindful of lines, clips, EKG leads, jewelry that may be in lung field or otherwise on x-ray.
 Figure 27. Uniformly Dark Grey Lung Fields - Increased density may be due to airspace disease such as pneumonia, masses, pleural effusions, pulmonary edema, or atelectasis
 Figure 28. Left Lower Lung with Effusion - Decreased density may be due to pneumothorax or hyperexpansion due to COPD.
 Figure 29. Left Sided Pneumothorax with Tension Component - Note that heart is being pushed to the right
There are several other findings to look for with the lung fields. Sometimes they are obvious and take over most of the view of the lung fields and other times they are subtle and scattered or singular.
 Figure 30. ‘Bat-wing’ Pulmonary Edem
 Figure 31. Septic Emboli
G – Gastric
Look for the gastric air bubble located in LUQ below the left hemidiaphragm and cardiac silhouette. Hiatal hernias are very common. Usually seen as a rounded density at the midline behind the heart. Sometimes an air-fluid level may be seen.
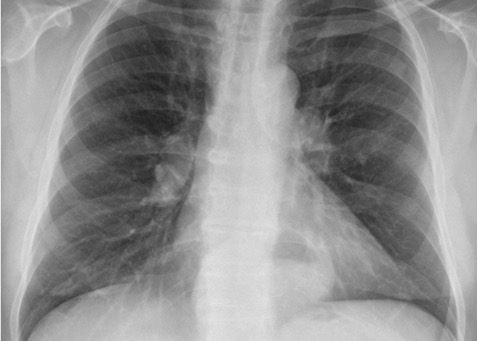 | 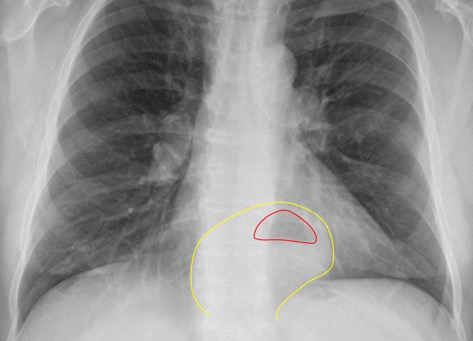 |
Figure 32. Diaphragmatic Hernia - Note retrocardiac density with air fluid level.
 Figure 33. Kartagener’s Disease (dextrocardia, airspace disease, situs inversus). Note the gastric air bubble in the right side of abdomen.
H – Hila
Locate right and left main pulmonary arteries.
Note any obvious contour abnormalities which may indicate masses or adenopathy.

Figure 34. Normal Pulmonary Artery Contour
Section 4: Learn Important Signs
Silhouette Sign
Normally on x-ray studies, two adjacent structures are visually distinct from one another because they have different densities. Thus you can see a silhouette of the dense structure against the adjacent less dense structure, for example the cardiac silhouette or diaphragms adjacent to the air containing lungs
 Figure 35. Normal Cardiac Silhouette - If something alters the tissue density, typically the less dense lung becoming
more dense due to mass or consolidation, the silhouette may be lost because the adjacent structures are now closer in density.
Figure 35. Normal Cardiac Silhouette - If something alters the tissue density, typically the less dense lung becoming
more dense due to mass or consolidation, the silhouette may be lost because the adjacent structures are now closer in density.
 Figure 36. Left Sided Effusion Causing Loss of Cardiac Silhouette
The classic example is a right middle lobe (RML) consolidation. Normally, the right heart border silhouette is seen because it is next to air containing lung parenchyma. In the presence of a RML consolidation which replaces air with denser inflammatory material, the right heart silhouette is lost.
 |  |
Normal Right Heart Border Loss of Right Heart Border from RM Infiltrate
Figure 37. Right Heart Border.
A right lower lobe consolidation will not result in loss of right heart silhouette because they are not adjacent to each other.

Sometimes it is not obvious on the PA view which side a consolidation is on because it may be located in the posterior sulcus and therefore obscured.
We can use the lateral view and an understanding of the silhouette sign to help determine when a consolidation is present and which side it is on.
 |  |
Figure 39. “Normal” View of PA and Lateral Chest
Notice how on this normal lateral the diaphragms extend all the way from anterior to posterior. The right diaphragm usually is slightly higher than the left and the left often will not extend fully anterior because of the heart being adjacent to it.
Now notice how the left diaphragm silhouette no longer extends posteriorly all the way. This is because it has lost its silhouette because there is a dense consolidation directly adjacent to it.

Air Bronchogram
Normally bronchioles are not visible because they are surrounded by air in adjacent alveoli
In the setting of air in the alveoli being displaced by fluid or cellular debris, the air in the bronchioles appears as a translucent tube against the hazy opacity of the affected airspaces.
This can be a clue that an opacity may be due to airspace consolidation and not mass.
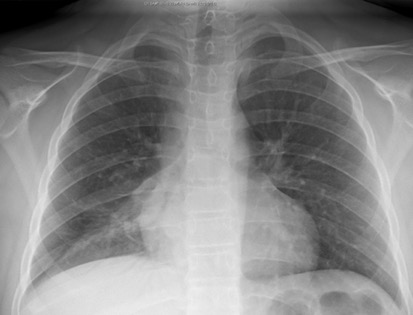 | 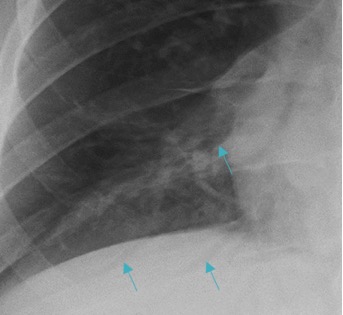 |
Figure 41. Air bronchogram sign (enlarged right lower lobe image on right)
Deep Sulcus Sign
In patients who are upright when imaged, such as for a PA/lateral CXR, air in the pleural space from a pneumothorax tends to collect in non-dependent locations, such as the apices.

Figure 42. Left Apical Pneumothorax - In patients who are supine, air may collect at the bases and anterior chest, potentially resulting in a deep sulcus sign, which indicates a pneumothorax.

Figure 43. Deep Sulcus on Right (Yellow Arrows) on Supine Radiograph
Continuous Diaphragm Sign
Normally, the central portion of the diaphragm is not visible because it is contiguous with the cardiac silhouette.

Figure 44” Normal” Appearance of the Right and Left Diaphragms - If it is visible then it is highly suggestive of free air in the mediastinum or peritoneal cavity.
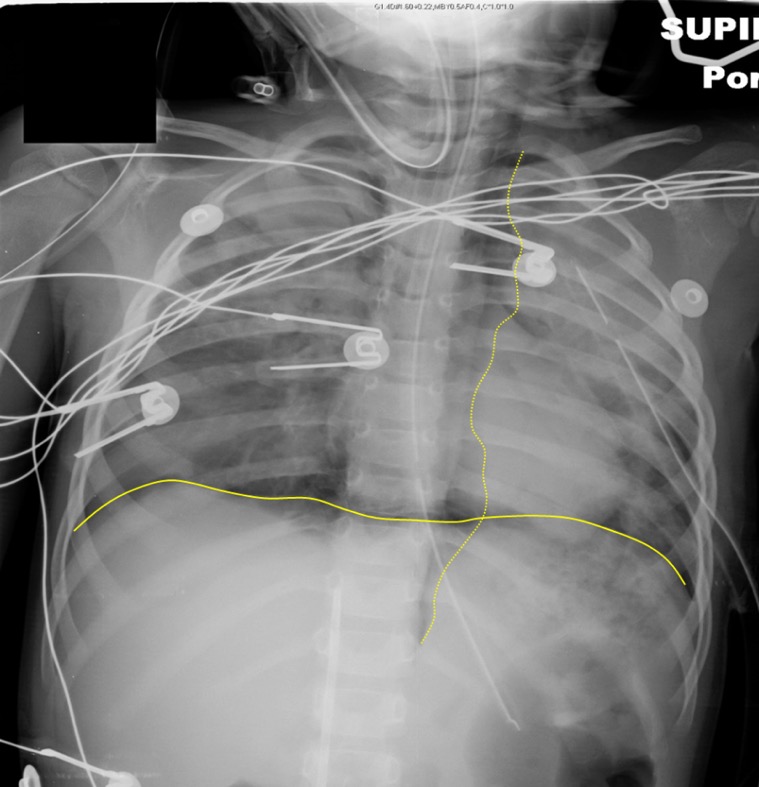
Figure 45. Continuous Diaphragm from Intraperitoneal Free Air - (Dotted yellow line outlines mediastinal air)
Case scenarios utilizing CXR as a diagnostic tool
Case 1: “Not feeling well”
A 60 year old male with hx of high blood pressure and bradycardia s/p pacemaker placement presents with 2 days of chest discomfort, palpitations, lightheadedness and shortness of breath that is worse when lying down. Prior to this, he
was in her normal state of health. He has been taking all of his medications as recommended. This past weekend, he reported helping his wife clean out the garage without incident, but stated it was much more rigorous than he had anticipated.
PMH: Hypertension, bradycardia
PSH: Pacemaker placement 5 years ago
Meds: Amlodipine 5 mg daily; NKDA
No smoking, alcohol or drugs
Vitals show: Temp of 98.7F, HR of 45 bpm, BP of 95/47mmHg, RR of 20 and oxygen saturation of 99%
Upon presentation, he is hemodynamically stable, speaking in full sentences and AAOX3. He has a surgical scar on the left chest with breath sounds at bases bilaterally, right worse than left. Bradycardia, but no murmurs, gallops or
rubs. He appears slightly diaphoretic. Rest of the examination is unremarkable.
A representative* chest x-ray shows:


Images courtesy of: Dr Anna Podlasek, Radiopaedia.org, rID: 71243
Images courtesy of Dr Anna Podlasek, <a href="https://radiopaedia.org/">Radiopaedia.org</a>. From the case <a href="https://radiopaedia.org/cases/71243">rID: 71243</a>. Image used under the Creative Commons Attribution-Non-Commerical-Share Alike 3.0 Unported license.
Figure 46.
What do you see in CXR above?
A- Trachea mildly opacified but appears midline
B- No observed rib fractures, or dislocations
C- Cardiac silhouette is enlarged with unclear borders. Implanted cardiac device with fractured leads
D- Diaphragm not clearly defined
E- Blunting of costophrenic angles with moderate sized effusion on the right
F- Mixed densities in lung fields bilaterally
G- No gastric bubble, or fluid levels appreciated
H- Prominent pulmonary vasculature, calcified aorta
Diagnosis: Fractured pacemaker leads
Case 2: “Fever and red arm”
43 yo female with history of insulin dependent diabetes, rectal cancer (currently taking capecitabine) and recent hospitalization for intra-abdominal abscess for which she received a PICC line on the left side. She was discharged home on IV antibiotics and has a nurse come to her house daily. She came to the emergency department for fever to 102F at home and chills that started this morning. She notes slight redness to the arm above her PICC line and that it was “flushing slowly” for the past 2 days.
PMH: Diabetes, Rectal Cancer
PSH: Diverting colostomy 1 year prior, c-section
Meds: Insulin, capecitabine, Linezolid, cefepime; NKDA
Prior smoker, no drinking or drugs
Vitals show: Temp of 101.5F, HR of 130 bpm, BP of 90/54, RR of 20 and oxygen saturation of 96%.
Upon presentation, she is hemodynamically stable and AAOX3. She is noted to have a port on the left upper, anterior thorax and left PICC line. Abdomen is soft, non-tender, non-distended, with colostomy noted. Regular rate
and rhythm. Lung sounds are clear to auscultation, bilaterally. Left arm with PICC line, small amount of erythema proximal with mild streaking up the arm. No fluctuance noted.
A representative* chest x-ray shows:
 Images courtesy of Dr Sarmad Aslam, Radiopaedia.org, rID: 79395
Image courtesy of Dr Sarmad Aslam, <a href="https://radiopaedia.org/">Radiopaedia.org</a>. From the case <a href="https://radiopaedia.org/cases/79395">rID: 79395</a>. Image used under the Creative Commons Attribution-Non-Commerical-Share Alike 3.0 Unported license.
Figure 47.
What do you see in CXR above?
A- Trachea patent and midline, with no deviation
B- No obvious rib fractures or dislocations
C- Cardiac silhouette appropriate size with clear cardiac borders
D- Diaphragm rounded with no observed flattening
E- No blunting of the costophrenic angles bilaterally
F- Prominent bronchioles with mild cuffing; Chemo port with tip of catheter observed at cavoatrial junction, Left PICC line in brachiocephalic vein (not fully inserted)
G- Gastric bubble observed under the diaphragm
H- Pulmonary vasculature with normal contour
Diagnosis (one of them at least): Malpositioned PICC line
Case 3: “My child choked”
A 3 year old presents to the emergency department via EMS. Their dad says they’ve been having neck pain upon movement and inability to swallow that started a few hours ago. Their father said they had been playing in the other
room when he heard choking sounds. Child stopped choking before the father was able to get inside.
PMH: None; child was born at term and vaccines up to date
PSH: None
Meds: None
Vaccines up to date
Vitals show: Temp of 99.3F, HR of 150 bpm, BP of 95/45 mmHg, RR of 40 and oxygen saturation of 95%.
Upon presentation, they appear uncomfortable, are crying and in moderate distress. They have some drooling noted, however, their oropharynx is clear without any erythema or exudates. Depending on positioning, stridor can be appreciated.
A representative* chest xray shows:

 Images courtesy of Leonardo Lustosa, Radiopaedia.org, rID: 99324
Images courtesy of Leonardo Lustosa, <a href="https://radiopaedia.org/">Radiopaedia.org</a>. From the case <a href="https://radiopaedia.org/cases/99324">rID: 99324</a>
Figure 48.
What do you see in CXRs above?
A- trachea patent and midline, round opaque foreign body observed in the esophagus (note that lateral is critical showing that is posterior to trachea)
B- no broken ribs, or obvious dislocations
C- Cardiac silhouette normal size, with appropriate borders
D- diaphragm round and not flattened
E- costophrenic angles clear with no effusions
F- lungs fields with no opacifications
G- gastric bubble and bowel observed under the diaphragm
H- pulmonary vasculature without crowding and normal contour
Diagnosis: Esophageal foreign body
Case 4: “I can’t breathe”
A 21 year old male with a history of moderate persistent asthma presents to the emergency department with chest pain and difficulty breathing. He states he was smoking some marijuana in his dorm room and when taking a deep inhalation,
had a coughing fit. He states that since then he’s had increased coughing over the last several hours and substernal chest pain.
PMH: asthma
PSH: Appendectomy 5 years ago
Meds: Albuterol PRN; Budesonide daily (patient states he takes medications)
+ smokes marijuana, drinks 2-3 servings of alcohol each weekend, no other drugs
Vitals: Temp of 99.2F, HR of 110 bpm, BP of 110/50, RR of 22 and oxygen saturation of 98%.
Upon presentation, he is hemodynamically stable, speaking in full sentences and AAOX3. He is thin and has a surgical scar on the right lower quadrant. Clear to auscultation bilaterally, no wheezing, crackles or rhonchi. Regular
tachycardia noted and rasping sound noted over precordium with heart sounds. No other notable findings
A representative* chest x-ray shows:

Images courtesy of Dr Aneta Kecler-Pietrzyk, Radiopaedia.org, rID: 52903
Images courtesy of Dr Aneta Kecler-Pietrzyk, <ahref="https://radiopaedia.org/">
Radiopaedia.org</a>. From the case <a href="https://radiopaedia.org/cases/52903">rID: 52903</a>. Image used under the Creative Commons Attribution-Non-Commerical-Share Alike 3.0 Unported license.
Figure 49.
A- Trachea midline and patent
B- No broken bones, or dislocations
C- Cardiac silhouette normal in size with pneumomediastinum
D- Rounded diaphragm with no discontinuity
E- No blunting of costophrenic angles
F- No opacification or hyperdensities noted
G- Bowel noted below the diaphragm
H- Pulmonary vasculature with no adenopathy or abnormal contour
Diagnosis: Pneumomediastinum
*CXRs are representative, but not the actual x-rays for the clinical scenario
Pearls and Pitfalls
Take your time to learn a systematic way to read CXRs - it will increase your confidence, reduce bias and improve diagnostic accuracy.
Practice reading CXRs before final reads are available.
Clearly communicate findings on CXR with patients, especially if incidental findings are noted.
Case Study Resolution
The xray tech completes the xray, which is shown below:
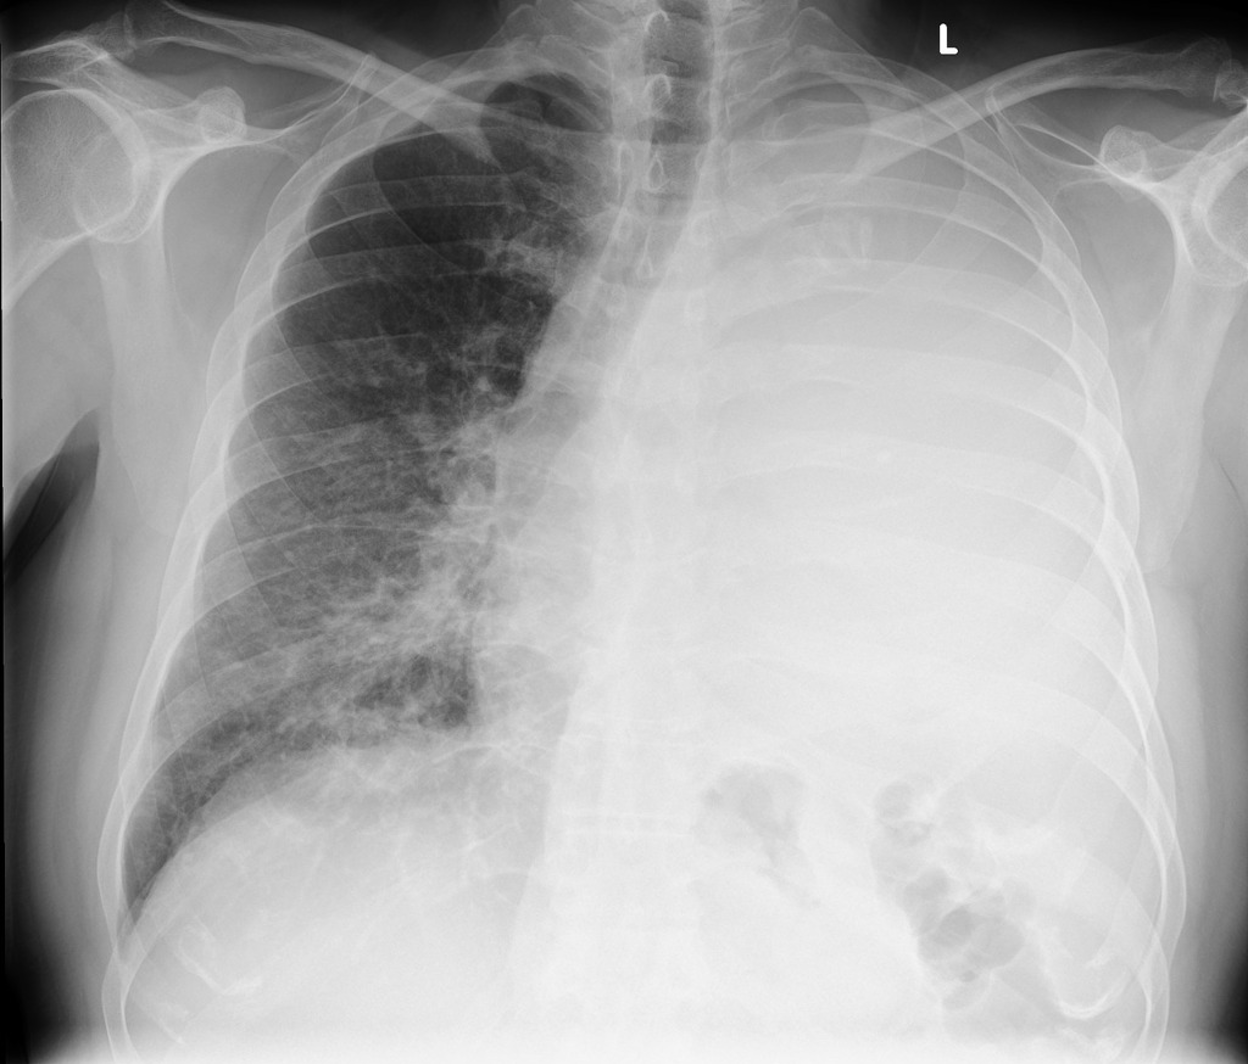
Figure 50. The patient’s Chest Xray. Image courtesy of Bickle I, Massive pleural effusion with mediastinal shift. Case study, Radiopaedia.org (Accessed on 28 Feb 2023) https://doi.org/10.53347/rID-88288. Image used under the Creative Commons Attribution-Non-Commerical-Share Alike 3.0 Unported license.
You quickly recognize the large pleural effusion and do an emergent thoracentesis. You take off 1.75L, and now the patient is doing much better. She is now satting 94% on 2L NC and shakes your hand in appreciation of the great care you provided.
References
Brant, William E, and Clyde Helms. Fundamentals of Diagnostic Radiology, 4th ed. Philadelphia: Lippincott Williams and Wilkins, 2012. Hardback.
Corne, Jonathan, and Maruti Kumaran. Chest X-Ray Made Easy, 4th ed. Edinburgh: Elsevier, 2015. Paperback.
Guttentag, Adam. “Basic X-ray Interpretation,” Learning Radiology,http://www.learningradiology.com/lectures/facultylectures/Basic%20Chest%20X-Ray%20Interpretation/player.html.
Radiology Masterclass, http://www.radiologymasterclass.co.uk/tutorials/tutorials
Smithuis, Ron and Otto van Delden. “Chest X-Ray – Basic Interpretation,” The Radiology Assistant, http://www.radiologyassistant.nl/en/p497b2a265d96d/chest-x-ray-basic-interpretation.html.